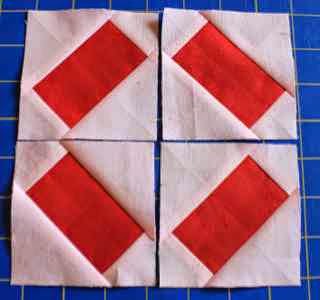
This one looks like a simple enough block. However, it has a combination of "on point" and rectangles. I went ahead and sketched it out full size on graph paper to find some even measurements to work with. There seem to be a lot of variations of this block. This one is a four patch version. It could have also been done with one large central square. Maybe next time.
I used a red fabric for July, but really debated a background color. "Light red" is a difficult concept, and I have, in general, tried to avoid white and cream in this quilt. So I chose pink instead, though I'm not sure how it will fit into the finished quilt.
Cutting directions.
From dark red, cut 4 rectangles 2 by 3.25 inches.
From the light background fabric, cut four 3 inch squares and four 2 inch squares.
Take each background square and cut it in half along the diagonal.
Fold each piece in half and finger press to find the center point. Start by sewing one small triangle to the short end of each red rectangle.
Press and trim the dog ears.
Next, sew the large background triangles to the long side of each rectangle.
At this point you should have four rectangles surrounded by a slightly oversized frame of background fabric.
Each of these pieces needs to be squared up to 3.5 inches. Make sure to use the quarter inch lines to make sure you keep enough seam allowance outside each point.
Here is your 3.5 inch block, squared up and ready to go.
Arrange the four blocks together with the large setting triangles meeting in the middle and the red rectangles forming a nice little diamond/circle.
Here is your finished block.


Sneaky you posting a sampler block on the Friday day of July! I think I can sneak this one in today.
ReplyDeleteI like this very clever block.
ReplyDeleteCute block... I can see the inside made with a busy print for an added side pattern.
ReplyDeleteThanks for doing all these extra tutorials. I know they take a lot of your time, Angela. I'm not making them, but I am learning a lot about block construction.
Hugs
Great block. HAve ordered some reds so will be ready to go by the weekend xxx
ReplyDeleteThat's a great block.
ReplyDeleteYour directions are so easy to follow
Looks like a fun and easy block.
ReplyDelete