I have posted a button in the upper right hand margin of my blog. By installing this button into the margins of your own blog, you will be able to easily return with a simple click at any time. If you have not installed a button before, it is quite easy to do. If you look over to the right hand side, you will see some code in a box below the button. This is html code which is just website directions. I use blogger, so those are the directions I am providing. It should be similar on other blog providers.
Step one is to copy the code below the button icon in the right hand margin of my blog. I use a website called "Code it Pretty" to create the button and code each year.
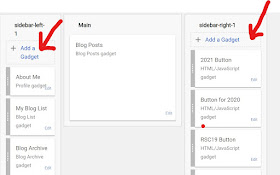
Next, find the layout screen on your blogger control screen. This is the same screen you use to create a new blog post.From the layout screen, scroll down until you see the areas for side bar left and sidebar right. I like my buttons to show up in the right margin, but yours can go wherever you like. Click on the hyperlink in blue that says "Add a Gadget"
This should activate a pop up screen which will allow you to choose the "Gadget" you would like to add. Choose the "+" next to HTML/JavaScript
Again, a pop up window should appear. Title the button something like RSC21 and then just paste the html code you copied earlier into the box. Click save and you should be done!
Now just look at your blog page and the button should show up. You may rearrange the order of the buttons if you like or delete buttons from challenges long gone.


Great tutorial! Added it to my blog. Now to go prep some pink hexagons....
ReplyDeleteThanks! I"ve been waiting the last few months to join! Thank you very much for the tutorial!
ReplyDeleteHow interesting, Angela! I go about it in a totally different manner. Backwards, with my luck! LOL!
ReplyDeleteI am so looking forward to this!
ReplyDeleteMichelle
https://mybijoulifeonline.com