Friday, January 31, 2014

Rainbow Scrap Challenge Sampler - Baby Nines

I am totally cheating again with this block. There have to be some advantages to having SO many projects in progress, right?
I've been making these baby nine patches for about a year now.  I have them in most of the colors of the rainbow.  Someday they will make a fabulous rainbow quilt.  Until then though, why not put a few to good use?
Each nine patch is made using 1 inch strips.  You will need at least three strip sets that are a minimum of 8 inches long.  Shorter sets with different fabrics will give you more variety.  Two sets should be dark light dark and the other should be light dark light.  Sub-cut each strip set into one inch segments.  I know if seems tiny, but the seam allowances nestle nicely on the backs.  Really, they do.
Make 8 adorable little nine patches.
You will also need 8 squares of background fabric.  I chose a solid light pink.
Alternate the nine patches with the solid squares and sew together as four patches.  Press toward the solid squares when possible.  


Sew the four patches together to make a finishes 16 patch which should measure 6.5 inches unfinished.  

Thursday, January 30, 2014

Party Time for Pink

As some of you have guessed, the new color for February will be pink.  I'll try to use most of the darker  and brighter shades and save the pastels for later.  Having said that of course, it will necessary to use some of the lighter shades for contrast in the sampler blocks.  The Rainbow Scrap Challenge is about using your scraps, if that means bending the rules, then go for it!
If you have not entered the January giveaway yet, please make sure you head over to this post to get your name in before I draw the lucky winner.  I'll announce the winner on Saturday as we all start to brag about our beautiful pinks.  

Monday, January 27, 2014

Rainbow Scrap Challenge Sampler - 36 Patch

I totally cheated on this block.  I have a bin of nine patches made from 1.5 inch strips hanging out in my closet waiting to be turned into a quilt.  I dug though looking for blue nine patches and came up with these four.  
Notice that two of the nine patches have dark corners and two of them have light corners.

In case you don't have a bin of ready made nine patches, I'll do the math so you can make your nine patches from scratch.  You will need three blue strips and three white strips.  Each will need to be at least 9 inches long.  Make one strip set that has two blues and white in the middle and one that has two white strips with a blue in the middle.  Press toward the dark and sub cut into 1.5 inch sections.  Use smaller strip sets for more color variety or sew individual 1.5 inch squares together if you prefer.

Sew the four nine patches together so that the white and blue squares alternate.  Your unfinished block will be 6.5 inches.  

Sunday, January 26, 2014

Slow Stitching Sunday Time

 I am amazed at how often I use all the scrapbooking supplies that I collected while I was still doing albums.  I had a nice collection of circle and oval templates that were just right for getting to photo fabric ready for reverse applique.  I tried to find the biggest size that would still fit in the diamond shapes that will go into the quilt.
 Those got traced onto freezer paper and ironed to the front of each diamond.
 I then cut out the oval with a quarter inch seam allowance and turned the edges under with a bit of disappearing school glue.
The frames are all prepped now and I am ready to settle in for a little hand applique work.  I am hoping that Netflix has some new movies to enjoy, otherwise I'll continue on with the Sherlock episodes that I discovered last Sunday following Downton Abbey.  

Anniversary Quilt

I've been putting off the anniversary quilt for Kurt's mom.  First I didn't have a sewing machine, and then I didn't have the photos.  Since Kurt's mom was diagnosed with lung cancer at Thanksgiving he wants her to have the quilt sooner rather than later.  Kurt printed the photos for me this morning on some of the special printer fabric.
 Now I need to prep the photos for reverse applique and sew them behind some plain cream diamonds that I have ready to go.
 Here are the other blocks so far.  They are a combination of crumb diamonds in cream, gold and brown along with the ones that I had signed by guests at the anniversary party.  I'll add the photos in as soon as they are ready.
Here is the inspiration quilt which belonged to my mother-in-laws mother and was passed on.  It is was made in 1884.
So, I have some reverse applique in my future.  It will be nice to settle down with some handwork as soon I finish the preparation.   

Take 2

I've been wanting to try a zig zag quilt with no diagonal seams.  I remembered seeing one on Crazy Mom Quilts at some point in the past.  So I googled it.  There is a nice little tutorial here.  Of course, in her example, all of the alternate rows are the same fabric.  That would have made things much simpler.  I wanted three shades of grey to graduate down the quilt which meant making two strip sets for each yellow.  There is a bit leftover, but it wasn't too hard to puzzle together once I had the idea started.  I'm going to add a narrow band of dark grey at the top and a wider band of light grey at the bottom.  Maybe even a duck.  Maybe I'll just quilt a duck.  In any case, after the original failed attempt, this one came together quite quickly.  I'm going to go finish sewing the rows so that I can get back to my mother in laws anniversary quilt.  Kurt is starting to wonder why it is taking so long.  

Saturday, January 25, 2014

Uninspired Baby Quilt -- Needs Help


A coworker is having a baby girl and I asked about the colors.  Yellow ducks on a pale grey background was the answer.  I thought I would whip up some cute little yellow nine patches and mix them in with a bit of grey.  Still not feeling it though.  Maybe I'll have to sleep on it a bit.  I'm not good at "modern",   Yellow and grey screams modern to me.  Am I trying to be too traditional?  What would I do to fix this up?  Asymmetry, negative space, ducks?  Help?  Any and all suggestions most welcome.  

ScrapHappy Saturday - Blue Suede Shoes

 Welcome to the last BLUE ScrapHappy Saturday.  It has been exciting to see so many new people joining in to the Rainbow Scrap Challenge this year.  I have truly enjoyed visiting new blogs and seeing all the great ideas.  It makes me wish I could quit my day job and stay home to sew forever.
I hope you have made a dent in your blue scraps this month.  I know I have.  Last Sunday I spent quite a bit of time turning 1.5 inch strips into this pile of postage stamp blocks.  Each one is a 36 patch.  Some will go together to make giant framed blocks and some I will save to use "as is".
Because the month is winding down, it is also time for the Vicki Welsh Hand Dyed fabric giveaway.  You can see some of her work here.   The best thing about using up so many of your blue scraps is that you have made room for some new and colorful additions to your stash.  One lucky reader will win this color wheel assortment.
Carla was the winner last time and she has already had the courage to start using hers in some great looking pickle dish blocks.  If you don't win this time, please be sure to try again next month.  To enter the drawing, just leave a comment on this post telling me where you are from.  I will choose the winner next Friday and announce it when I post the new color for February.
Until then, don't forget to use the linky tool below to share your final thoughts on blue.  The links will be up all week, so feel free to continue tying up your loose ends while the month finishes off.

Wednesday, January 22, 2014

Rainbow Scrap Challenge - Happy Squares

Framed squares are such a nice quilt pattern. It works great with novelty squares for a bright and happy kids quilt.  This miniature version is really just a modified nine patch.  The solid fabric is a very dark navy.   Because blue and green will go next to each other in the finished quilt, I wanted a few blocks with both green and blue together.  I picked a print that had both green and blue together.  and found a solid to match.
Start with 1.5 inch strips in blue and green.  From the blue fabric, cut 6 1.5 inch squares and four 1.5 by 3.5 inch rectangles.  Cut exactly the same pieces from the green fabric.
When the pieces are all arranged, can you see how the block is a lot like a nine patch?

Start with the squares.  Sew two sets that are green blue green and two sets that are blue green blue. Press toward the blue.
Now sew a dark rectangle to the top and bottom of the blue green blue sets and a green rectangle to each side of the green blue green sets.
Here are your four subunits, each of which measures 3.5 inches square.  Notice that the seam allowances are rotated, vertical for the green and horizontal for the blue.
Sew the four blocks together.
Here is your finished block. 

Tuesday, January 21, 2014

Rainbow Scrap Sampler - Split Pinwheel

I was working on some of the star blocks for my Mai Tai quilt yesterday.  I didn't plan to get back to it again until the weekend.  While checking up on a few blogs though, I found a Tiny Tuesday post by Deb at VTquilter and got an urge to whip up a quick block.  Though the Mai Tai block is 7.5 inches, the triangle subunits are 3.5 and would easily fit together to make a 6.5 inch block.
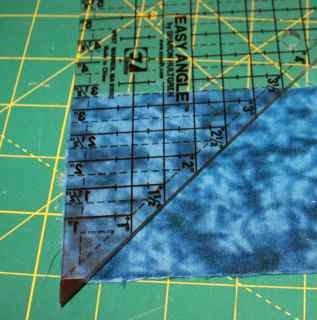
This one uses two different specialty rulers.  First, the small triangles are cut using the companion angle ruler.  This puts the straight of grain on the outside of the block.  Looking at the triangle above, you can see that the hypotenuse is lined up along the bottom which is on the grain of the fabric.  This will prevent distortion as the block is put together.
From a 2 inch strips of light fabric, cut 4 triangles.  Repeat with the medium fabric.
Then use the easy angle ruler and a 3.5 inch strip of dark blue fabric to cut 4 large triangles with the straight of grain on the outside edges.  In this case you can see that the hypotenuse is on the bias.  That is OK this time as this will be in the middle of the block.
Here are all the necessary pieces:
4 small triangles of light blue
4 small triangles of medium blue
4 large triangles of medium or dark blue
Place the small triangles right side together and sew along the edge that is NOT the hypotenuse.  Make sure that you feed them all through the same way.  I put all the light triangles on the top.   If you sew them with the dark triangles on top, your block will spin the other way (Ask me how I know!)   Repeat for all four subunits.  Making sure that all of your blocks have the light and medium fabrics in the same places.
Gently finger press the small triangles open with the seam going toward the darker fabric.  Stay away from the hypotenuse.  It is on the bias and will stretch like crazy if you are not gentle.  The two small triangles sewn together should be exactly the same size as the big triangle.  Check to be sure.  If all is well, place the big triangle, right sides together on the split triangle and sew along the hypotenuse.  Repeat for each of the four subunits.
Press the block with the seams going toward the solid square.  Pressing away from the pieced subunit will generally reduce bulk in the finished block.
Speaking of reducing bulk, don't forget to remove all three dog-ears.
Arrange the four subunits as shown in the picture.  Notice that the long lines all point to the middle and the large triangles rotate 90 degrees as you go around the block.  The small triangles will appear to form a solid square behind the large pinwheel.
Tada!  Your split pinwheel block should measure 6.5 inches.  Stand back and enjoy your new block.  

Monday, January 20, 2014

Sewing Today

I had a bit of time today after piano lessons and before the dentist to sew a bit.  Taking the nine patches that have been leaders and enders this month, I added a neutral border and some blue cornerstones.  These will be part of a Mai Tai quilt -- eventually.  The alternate star blocks are started, but will have to wait for another day.
It was nice to have a holiday today, but I am already starting to regret all the school work I didn't get done.  Every weekend I make a list of things I should get done, and every time I end up putting it off in favor of other things.  But with an extra day, my teeth are shiny clean and the laundry is all caught up.  So with a deep breath, the cycle will start again.

Rainbow Scrap Challenge Sampler - 54 40 or Fight

Today's block is an old traditional block called Fifty Four Forty or Fight. The name originated with an Oregon Boundary dispute way back in 1844.
It is a basic nine patch block, meaning that each subunit will be 2.5 inches unfinished.  One subunit is a spikey star point while the other is a nice basic four patch.
I used three colors for my block, a dark, a light and a medium.  The light and medium will make up the four patches.  You will need two strips that are at least 15 inches long ( 1.5 inch subcuts times 10 units to make 5 four patches).  Feel free to leave a little extra length for mistakes and straightening.  The wider strips are 2.5 inches of light and dark fabrics.  I cut mine using the tri-recs specialty ruler.

**If you don't have a tri-recs ruler, you could also draw a paper piecing pattern or even (gasp) make yourself a template.  Just draw a 2.5 inch square and mark the center of one side, then draw a straight line from the corners to the center mark.  **

For the tri-rec method You will need a strip about 10 inches long of the dark and 14 inches of the light.  I say about because the width isn't a nice even increment, just the height.
The background for the star points is cut using this pyramid part of the tri-recs ruler.  You will need four background pieces, I doubled my fabric and cut them two at a time.  Just line up the 2.5 inch mark with the bottom of your fabric and then cut your triangles out.
The spikey portions are cut in a similar manner, but they MUST be cut two at a time.  Because they are mirror image pieces, your fabric should be folded wrong sides together which will give you the pairs you need.  Notice that the ruler gives you a little indentation on the top to help you align your blocks for sewing.  Make sure you are lining your fabric up along the 2.5 inch line on the ruler.
Take one side of each pair and line it up so that the indentation is even with the bottom of the base piece.  There is a little triangle of light blue sticking out the bottom and part of the dark blue hangs off the top.  This is why the indentation is so important.  Sew all four wings on and finger press.  Repeat with the other wing to make 4 spikey star blocks.  Each should measure 2.5 inches unfinished.
The four patches are a breeze by comparison.  Sew your light and medium 1.5 inch strips together and press toward the medium.  Sub cut these into 1.5 inch sections.  You will need 10 sections to make 5  four patches.
Nestle the seams and sew these together making sure to press carefully. These units should also measure 2.5 inches unfinished.
Notice the color placement of the four patches.  They rotate nicely around the block.
Sew the sub units together and press carefully.  Generally the seams should go away from the spikey star point as much as possible to allow them to lie nicely.  

Sunday, January 19, 2014

Whata Weekend!

 I am so ready to settle down with some binding and enjoy a little slow stitching.  We rented Despicable Me 2 to enjoy with the kids, and then after bedtime, it will be time for Downton Abbey!  Such a nice way to end a busy busy week.  I am just ready to turn the last corner and from there it will be the home stretch.  I'll have to think about a hanging sleeve and then think about where to hang this one.  It isn't going to be a bed quilt, but it doesn't really go with most of the colors in our house.  Maybe we should redecorate?
 I was gone all day yesterday for Science Olympiad.  It was in Orlando which meant leaving while it was still dark and getting back after dinner.  The kids had a good time and enjoyed the competition, though we came home completely empty handed.  Not a single place out of 23 events.  So sad for the kids.  While I was doing that, Kurt took Ryan to a FAMAT math competition, also in Orlando, but on the other side.  Then he and the girls did a quick trip to Universal while Ryan was doing his math thing.  Even with all that, they were still home by early afternoon.
Somehow while we were away, the closet organizer that holds the printer and assorted electronic gadgets in the closet in my sewing room collapsed.  We are now in the middle of trying to reorganize and arrange everything.  The upside is that I will now get the closet for all of my sewing things and the electronic paraphernalia is going to live somewhere else.  Kurt has already put up these shelves at one end of the closet.  I'll need to decide how to best arrange things, but it should offer quite a bit of useful storage space.
 At the other end I have installed this hanging bar for quilts with a shelf above for WIPs.  It will be nice to collect everything together in one spot instead of having them scattered about the house.
This was the view of a neighbors house on the way to school on Friday.  FROST!  I know ya'll up north are used to it, but it is quite unusual for us here in Florida.  Keep in mind that our schools don't have inside hallways and it is impossible to buy an ice scraper.  We tried once to find one as a joke for a friend moving to Colorado and it just couldn't be done.
Tomorrow is a day off school for Martin Luther King Jr's birthday.  Sydney has a piano lesson, but I hope other than that to spend the day with fabric.  Hope you find some time to slow down today and head over to Kathy's Quilts to see what hand stitching people are up to today.  

Thursday, January 16, 2014

Weekday Puttering

 There never seems to be enough time or energy during the week to do much on the sewing front.  Theoretically there is time, but it never goes with energy.  I did catch up on some ironing though.
 There was quite a bit of time spent on Sydney's Science fair project on the effects of acid rain on elodea.  Anna has Lacrosse conditioning every day and needs a ride home.  Ryan has football two evenings each week.  Don't forget Academic team on Mondays and Legos on Fridays.  This Saturday I'm at Science Olympiad and Ryan has a math competition.  Though they are both in Orlando, they don't seem to be very close to one another.  Life is good, but sewing time will have to squeeze around all the rest for now.
I took the dog for a walk after dinner tonight and the moon was HUGE.  I thought it looked so pretty framed against the palm trees but just couldn't capture the moment in a photo.  Maybe someday I'll take up photography if I need a new hobby.