Thursday, December 31, 2020

Sister's Choice

Sister's Choice is a classic quilt block.  I have seen several variations on the theme, they all work on the same 5 by 5 grid, but the center of each side is often a contrasting color.   While I think this has a nice effect in the finished quilt, It isn't doesn't work as well with my one color per month theme.  I chose a variety of background colors for this sample block and then made another with consistent fabrics which I think I prefer.  It just depends on what you have available in your scrap bin.  Right now I have plenty of 2 inch strips to accomplish the uniform look.    
I always have a collection of monochromatic nine patches hanging around.   Every year I try to come up with a new way to put them to use.   They work great as leader and ender blocks because they don't take a lot of planning or organization.  This year I am going to turn them into Sister's Choice blocks.   The nine patches are made with 2 inch squares.  It would be just as cute in 2.5 inch blocks of course, or even 1.5 inch for the miniature block lover's out there.   
  • 1 nine patch made from 2 inch squares (unfinished size is 5 inches)
  • 8 squares in pink which are 2 inches
  • 4 squares in neutral which are 2 inches
  • 4 rectangle in neutral which are 5 by 2 inches
The star points use a sew and flip method.   You may use a pencil to mark a diagonal line on the back of each pink square or just eyeball it and hope for the best.   
Sew along the diagonal drawn line.  You may "double sew" these by sewing and additional line parallel to the drawn line to yield bonus triangles.  I chose not to do that this time, but I usually can't resist.   
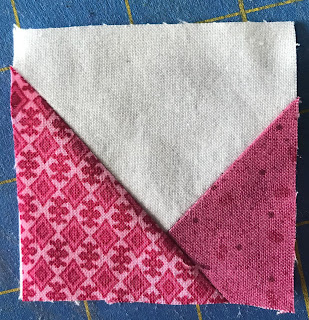
Now flip open the corners and make sure that the edges are even.  If you have a bit of extra pink hanging off of the edges, you can trim them with scissors.  The entire unit should be the same 2 by 5 inch size as the starting rectangle.   

Go ahead and trim away the extra waste triangles, if you double sewed, these little guys will make adorable half square triangles. Repeat this procedure for all 4 rectangles.   

Each of these rectangles will surround the center nine patch, forming star points.   Add the remaining 4 background squares to the corners and sew as you would for any nine patch block.  Press away from the star points on the sides, but toward them on the top and bottom so that the seams will nest when you sew the blocks together into a top.  

Here is the same block, but with one background fabric instead of 8.   I think it adds a bit of consistency and ties the pinks together nicely.  
Here are the two blocks side by side.  I do like them both to be honest.   The block is 8 inches unfinished, which will be 7.5 in the finished quilt.  If I make 10 colors, that will be 75 inches, so I will aim for 6 to 8 of each color.   


Full Stop

 I have a challenge quilt planned for this year.  It is called Full Stop and the theme is punctuation.   Check out an inspiration video related to punctuation here.  I haven't chosen all the punctuation marks yet, but January is going to be a hashtag. 


It is going to be a random length row by row quilt.  Each month I will make one row of the quilt, and post directions.  Because all of the punctuation marks are going to be sized differently and I just don't want to try to make all the rows work out to the same length, the rows will be randomly sized and then background fabric will be added to either end to bring each row up to the same size.   I am going for a nice staggered layout with a modern flair.   My target size will be a large lap quilt of about 52 by 64 inches.  It will be quite easy though to make the quilt larger or smaller by adjusting the number of rows or blocks.   I have worked up a clip art mock up of the general idea above.   Because it is a scrap quilt, I can not give you fabric requirements.  I am planning to work in solids this year and use a variety of greys for the background.   I have the first row done and the directions for that will be posted tomorrow.   

How to Button


I have posted a button in the upper right hand margin of my blog.  By installing this button into the margins of your own blog, you will be able to easily return with a simple click at any time.  If you have not installed a button before, it is quite easy to do.   If you look over to the right hand side, you will see some code in a box below the button.   This is html code which is just website directions.   I use blogger, so those are the directions I am providing.  It should be similar on other blog providers.  

Step one is to copy the code below the button icon in the right hand margin of my blog.  I use a website called "Code it Pretty" to create the button and code each year.  

Next, find the layout screen on your blogger control screen.   This is the same screen you use to create a new blog post.  
From the layout screen, scroll down until you see the areas for side bar left and sidebar right.   I like my buttons to show up in the right margin, but yours can go wherever you like.  Click on the hyperlink in blue that says "Add a Gadget"  
This should activate a pop up screen which will allow you to choose the "Gadget" you would like to add.   Choose the "+" next to HTML/JavaScript
Again, a pop up window should appear.  Title the button something like RSC21 and then just paste the html code you copied earlier into the box.  Click save and you should be done!
Now just look at your blog page and the button should show up.  You may rearrange the order of the buttons if you like or delete buttons from challenges long gone.   


Shoofly Block


I am planning a two block quilt with nine patch variations this year.   I always struggle with 2.5 inch blocks.  Using them as just squares seems too big.   I've made lots of 16 patch quilts and was just ready for something different.  

A Shoo Fly is just a nine patch with half square triangles in the corners.   Instead of making traditional HST units, I'm going wonky this year in an effort to use up those extra triangles leftover from joining binding strips.   
This block uses the same sew and flip method as the star block, but with only one triangle per unit, it goes twice as fast.  You could also just use half square triangles if you happen to have extras of those around.  
It is just a nine patch, but with extra pops of color in the corners.  It should pair nicely with the star block for a simple two block quilt.  


Monday, December 28, 2020

Star Block

I'm working on a two block quilt this year.  It is based on nine patch variations built on a 2.5 inch base unit.  It would be adorable in a smaller size of course, but I needed and idea for 2.5 inch squares right now.   Blocks 1 is a star block, and block 2 is a shoofly.  I think these pair nicely because the colors are staggered.  

The base is just 8 neutral squares surrounding one of your main color.  January is going to be pink, so I started with that.   
The star points could be a combination of traditional half and quarter square triangles, but I'm trying to use up all my odds and ends, so I grabbed a stack of random triangles.  Most of them are leftover from joining binding strips.  Each block will need 8 triangles total.  

Start by laying a triangle right side down diagonally, do a quick flip to make sure that it will cover the corner of your neutral square when it is ironed over.   I play a little game of trying to maximize the amount of pink that will show and minimize the hangover. sew along the edge of the pink triangle and then iron it open.  The pink should completely cover the neutral background square.  There will be odd angles hanging over.  When you are sure you have the base square covered, but use that neutral square and trim off the extra pink with scissors or a rotary cutter.   I like to trim away the extra background fabric to minimize bulk, but this is a personal choice.  Because is leave an exposed bias edge, so you can also leave the base in place.   
Repeat the same procedure for the other side of the squares to make nicely paired star points.   

Here is the back, you can see that the pink fabric hangs over the edge.  Trim this extra away and then remove the background if desired.   

Here is one finished star point.  
And here it is from the front.   Each one will be unique and the angles will change depending on your starting triangles and sewing placement.  
Here are the four star points back in place again.   
Now just sew these together as you would any nine patch.  I chose to iron the seams away from the star points.  That should help the seams next when the two blocks are sewn together.   

I will post another tutorial for the shoofly block next.  It uses the same technique, but it is simpler because it uses half as many pink triangles.   


Sunday, December 27, 2020

String Block Tutorial


I didn't really know where I was headed when I started this quilt 7 years ago.  I just wanted to play with strings for a while and use up some of the strange strips that are always leftover when squaring up fabric during rotary cutting.   A string is any odd piece of fabric that is long and skinny.  I usually save anything that is narrower than 1.5 or 2 inches.  If it is wider than that, I cut it into strips or squares.
  
I like to use telephone book pages for my string blocks.  Any kind of paper works fine, but the thinner paper is easier to remove later.  Start with a strip of solid black fabric for the center.  I like to secure it temporarily either with a small dab of glue stick or with a pin.    Glue stick is one of my secret weapons for paper piecing.   It doesn't take much, but it helps keep everything where you put it.  

Now just dig through the scrap bin and find a strip of fabric long enough to go past the edge of the paper.   On the left side, sew a string of color and repeat of the other side with a neutral.  Sew with a nice straight quarter inch seam through both the fabric and the paper.  The paper will come out at the end, but it will let you know how long to cut your strings and help serve as the pattern.  Even with strings, it is still important to have nice seam allowances and straight seams, they don't have to run parallel to one another, but they should not be curved.  
Press the strings open on either side and you are ready to repeat the procedure.  It is OK if one of the edges is not perfectly straight.  You should still sew a straight seam, but you can use the top string as your guide.  Then you can trim the stray edge of just let it lie.  
Continue adding strings to either side until you get near the corners.   
For the corners, either try to use a wider strip, or find a triangle.  I like to use the extra triangles leftover from joining strips of binding.  If you have too many narrow strings in the corner region, it gets very bulky when joining the blocks together  
When you have covered all of the paper with strings, trim the block to 4.5 inches.   This is the most satisfying part of the process for me.  Like cutting the crusts off of sandwiches, it leave everything looking so neat and tidy!Then just turn the block over and rip the paper away from the back.  This is a messy job, but lightens of up the block and makes them easier to join.  

Finally, sew the blocks together in groups of 4.   The dark strings all point to the center of the block, leaving the neutrals to frame the corners.  
I have not decided on borders for my quilt yet, but if you are not adding a border, make sure to stay stitch the outside edges. There are bias angles everywhere and SO many seams which would like to pop open during quilting.  I think that I might add a nice wide black border to mine and then finish it with rainbow binding.   


Saturday, December 26, 2020

Wrapping up 2020

What a long strange year we have all had.  There was unexpected time for quilting as quarantine popped up seemingly out of nowhere.  For me, a fever of organization had a phase along with lots of time reading and streaming TV.   Plenty of time for all of that, but also a lack of motivation as one day bled into another that looked just the same.   I have plenty of flimsies to show for the year, but a house full of returned students left me short on space to accomplish the actual quilting that would lead to finished quilts.  Still, with all of that, I am excited to plan for a fresh start.  This week, I hope that we will all share our accomplishments from 2020.  Then next week we can turn a page and enjoy a fresh start like no other.  

I have several new quilts in the works, and I will be posting tutorials for the blocks in January.  If you have new quilts planned and want to share links or instructions, I will be happy to list them on the RSC21 page.   I have almost fully committed to the idea of a new challenge quilt for 2021.  It is going to be called Full Stop!  And it will have a punctuation theme.   I have the first block done and will post a tutorial and more details on January 1.   First though, the linky tool is below, so let us wrap up the old before turning the page with finality. Rainbow Scrap Challenge finishes and other assorted quilts (mostly flimsies) from the year to forget.  

Diagonal Strings.  I have a tutorial for this block scheduled to post tomorrow.   
Framed 4 patches.  I always have a stack on nine patches on hand and have been trying to find a new way to use them each year.   Next year will be Sister's Choice.  
Ocean themed quilt for a friend.  I think I quilted more for other people than myself this year, hopefully that will change in 2021.  
Soul Searching - This may be the only quilt that I fully finished this year!  I have seen so many people make this quilt over the years and I have loved it each time.  
Cats quilted for another friend from work.  She made this for her son but then was scared to quilt it because she has only ever tried stitch in the ditch.  

Sprouts (flimsy).  I thought this one would be taller, but in the end I just let it do what it wanted.  
9 Carat Diamonds (flimsy).  This is a pattern I have made at least a couple of times.  I saw it initially on Oh Scrap!.   I will look for link to the tutorial.  
Four Squared, I finished this one last year but sewed the binding on this year.  This is another pattern I keep making over and over.   
Temecula Sampler (flimsy).  This was a block of the month that I had been saving for many years.   I think it needs a border or two to feel done.  
Tiny Tuesday Sampler (flimsy).  This was the challenge quilt from 2019.  I didn't know when the year started that we would be moving houses.  Things got a little hairy, but I still finished it in the end.  I think this one wants a wide border in grey with maybe an inset of small rainbow fabrics.  
New York Beauty (flimsy).  I designed and started this long ago, be then got sidetracked along then way.  I think an wide border is needed on this one as well.  
Zig Zags, quilted for a friend.  

Beachside for our bed.  I guess this is another quilt that I fully finished in 2020.  
A few more quilted scrap baskets
Assorted zipper pouches.

And a partridge in a pear tree?