
Saturday, May 31, 2014
Last Green Day
Friday, May 30, 2014
Golden Yellow for June

Rainbow Scrap Sampler - Framed Four Patches
This framed four patch is a simple combination of squares and rectangles.
 From the dark fabric cut four 2 inch squares and two 2 by 3.5 inch rectangles
Cut the same pieces from the light fabric.
 Sew the 8 squares together into pairs of dark and light. Press toward the dark. Use the pairs to make two four patches.
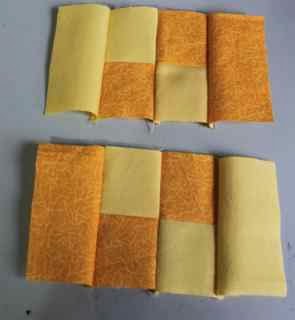 Sew a dark rectangle to one side of the four patch and a light rectangle to the other side.
Repeat the process for the other four patch, but reverse the placement of the dark and light rectangles.
 Notice how the placement of the fabrics makes a nice frame around the center four patch.
Cut the same pieces from the light fabric.
Repeat the process for the other four patch, but reverse the placement of the dark and light rectangles.
Wednesday, May 28, 2014
RSC Sampler - Calico Puzzle
I picked a really easy one for today. Writing the directions will take far longer than putting the block together.
 This is a nine patch, so it will work with 2.5 inch subunits.
Green print = 4 squares each 2.5 inches unfinished
Dark green - 1 square
Place light and dark green strips, right sides together and use the easy angle ruler, cut four HST units.
Sew the HST units together, press and trim dog ears.
 Place the green print fabric on the top and sides of the dark green center square. Use the HST units to form the corners with the diagonal seams all pointing to the center of the block. Check the placement of the dark sides. They should rotate as they would for a pinwheel. Sew and enjoy.
That's all. Done. TaDa!
Green print = 4 squares each 2.5 inches unfinished
Dark green - 1 square
Place light and dark green strips, right sides together and use the easy angle ruler, cut four HST units.
Sew the HST units together, press and trim dog ears.
That's all. Done. TaDa!
Tuesday, May 27, 2014
Tiny Tuesday - Broken Dishes Stars

So the finished size will be 5 inches. I wonder how these would look with my Itty Bitty Nine Patches? I'll have to give that some thought.
Happy Tuesday everyone! Just three exam days in the school year. Those days are made much easier this year due to the end of course exam my students took at the begining of the month. As a result, they have made a Biology game for their final exam and we will spend the two hour exam period playing those games. We had the first round on Friday and it was SO MUCH FUN! Great way to finish off the year.
RSC Sampler - Broken Dishes
I started to like broken dishes quite a bit while making Jamestown landing. So many ways to arrange a simple unit!
 Start with 2 inch strips of light and dark. Place them right sides together. Using the easy angle ruler, cut 16 HST units.
 I was curious as to how long the strips needed to be. Two HST units together are about 3 inches long. 16 units divided by two times three inches should be 24. So I think 24 inches should do it. Two 12 inch strips would work as well or whatever combination of scraps you have to bring you to the 16 subunits needed. You could even mix and match colors to scrappy it up a bit.
 Sew the HST units along the hypotenuse, trim the dog ears and press the seams toward the dark fabric.
 Start by sewing all the units into twosies. Notice that the center seams meet in the middle, but the dark is on the bottom of the left and the top of the right.


 Pair the twosies up into pairs. Again, dark should pair with light. The seams should alternate if you have pressed correctly. You should have four units, each at 3.5 inches unfinished.
 Place the four broken dishes together again alternating the dark and light squares. Carefully press from the back to make sure all of the seams lie flat.

The HST units are easiest to sew if you start on corner where the seams are not all meeting. As long as all the blocks are arranged the same and with dark touching light, it will work out in the end.
Press the twosies with the seams all going toward the dark fabric.
Of course I realized as I was posting this block that I had already done a broken dishes block this year. No need to worry though. Broken dishes is one of those blocks that can go lots of ways. Just turn the dark corners in to the center to get a star. Instead of unsewing the green block which had beautiful seams, I dug out the pink block which did not. So it is now a star and not the same block at all anymore.
Monday, May 26, 2014
RSC Sampler - Carrie Nation
Kathy has been working on Carrie Nation blocks for the Rainbow Scrap Challenge. They are SO cute that I wanted to give them a try in the 6 inch size. So tiny, so sweet.
 Find 2 inch strips in medium and light that are at least 8 inches long.
You will also need 4 squares of light fabric that are 2 inches each.
Next, cut 1.25 inch strips in light and dark. That's right, I said 1.25 inch strips. I'm sorry for that, but it makes the math work. The strips need to be at least 12 inches long in total. Feel free to split them into smaller strip sets if you like. The quarter inch mark is right there on the ruler between the 1 inch and 1.5 inch marks. Don' be scared. They are just scraps after all.
 Sew the medium and light 2 inch strips together. Then sew the 1.25 inch strip sets together. Press both sets of seams to the dark. Make sure to keep your strips nice and straight during the pressing process. It is easy to get wonky. Having a bit of extra fabric in the sets will allow you to straighten things up as you go.

Sub-cut the small strip set into 1.25 inch sections. See where the quarter inch mark is? Not so bad really. Make sure you have 8 sections total.


 Press the four patches with twirled seams. The small four patches should be 2 inches unfinished. Check to be sure. Use them to make four patches with the light colored squares. Make sure all the dark squares are running along the same diagonal line.
 Arrange the four patches as shown and sew together.
 This would be a great scrappy block. I love the way the light fabrics make a nice path for the tiny dark squares.
You will also need 4 squares of light fabric that are 2 inches each.
Next, cut 1.25 inch strips in light and dark. That's right, I said 1.25 inch strips. I'm sorry for that, but it makes the math work. The strips need to be at least 12 inches long in total. Feel free to split them into smaller strip sets if you like. The quarter inch mark is right there on the ruler between the 1 inch and 1.5 inch marks. Don' be scared. They are just scraps after all.
Next, sub-cut the larger strip set. You will only need four of these sections.
Arrange and sew the smaller sections into four patches with the light and dark placed diagonally. Save the four light squares for the next step.
Design Wall Monday May 26 - Postage Stamps


Sunday, May 25, 2014
Slow Stitching Sunday - Marking Pens

RSC Sampler - Friendship Scrap Block
This seems like a simple little block, but I had a fun time figuring out how to best put it together.
 Start with 3.5 inch strips of a print and background green.
You will also need 4 squares of another green fabric that are 2 inches each.
Sew the HST units, trim dog ears and press. 2 squares should be pressed with the seams toward the dark and two with the seams toward the light.
 Draw a pencil line from corner to corner of the dark green squares.
 Sew along the drawn line. If you like, you can also sew again outside of the first line to get bonus triangles.
 Flip the green squares, press and trim the bonus triangles from behind. On the squares that have been pressed with seams toward the light, you will need to repress the seams from the dark green square toward the light fabric as well.
 The pressing directions seem complicated, but it will allow all of the seams to nestle when you sew the squares together.
 Arrange the four subunits with the dark squares pointing to the middle.
 Sew the four squares together and press.
You will also need 4 squares of another green fabric that are 2 inches each.
Sew the HST units, trim dog ears and press. 2 squares should be pressed with the seams toward the dark and two with the seams toward the light.
Saturday, May 24, 2014
RSC Sampler - Cactus Pot
This was supposed to be done last month. It was all kitted and ready to go, but there are only so many hours in the day and so it waited patiently until today. It would be nice in green too, wouldn't it?
I've had a wonderful day of sewing. Three day weekends feel so much longer than two day weekends, don't they? I am hoping to continue my sewing marathon in the morning. There are several blocks scheduled to post for the rest of the month. Pinterest is up to date for those who like to look ahead. The RSC Sampler page is updated as well. Yeah for relaxing days at home! I did realize as I was posting everything that I accidentally made the same block AGAIN. So now there are two Anvil blocks and two broken dishes blocks. You would think I would remember making the same block twice, wouldn't you? Well, best not to think too much about such things. Maybe I'll rearrange one of them later. Maybe not.
 I used two dark purples and one light purple. I would have used the same purple, but when working with scraps, I've learned to use what I have.
Dark purple = 1 square 3.5 inches
Light purple = 2 rectangles 2 x 3.5 inches each
Light purple - 2 squares 2 inches each
Using two inch scraps of light and dark purple placed right sides together, use the easy angle ruler to cut 6 HST units.
 Sew the HST units together, trim dog ears and press toward the dark. Check the block layout carefully. Arrange the HST units along adjacent sides of the large square with dark touching dark. Sew the HST units together and press toward the dark.
 Sew one pair of HST units to the left side of the large square.
Sew one light square to the right side of the other pair.
Pay careful attention to the direction of the HST units, it is easy to get them turned around.
 Sew the other set of HST units to the top of the large square subunit.
Also sew HST units to one end of each light purple rectangles. Again, notice the orientation of the dark purple. Press toward the large purple square.
 Sew one long rectangle subunit to the right of the square.
Sew the remaining light purple square to the HST end of the remaining long rectangle.
 It would have saved a few seams to use a single large triangle under the foot of the cactus pot, but I was pulling from the scrap basket and didn't have any larger pieces. It looks like it would be a HST unit cut from a 3.5 inch square or even a 4 inch square cut in half and then trimmed to size. Use what you have on hand, that is the essence of scrap quilting.
I've had a wonderful day of sewing. Three day weekends feel so much longer than two day weekends, don't they? I am hoping to continue my sewing marathon in the morning. There are several blocks scheduled to post for the rest of the month. Pinterest is up to date for those who like to look ahead. The RSC Sampler page is updated as well. Yeah for relaxing days at home! I did realize as I was posting everything that I accidentally made the same block AGAIN. So now there are two Anvil blocks and two broken dishes blocks. You would think I would remember making the same block twice, wouldn't you? Well, best not to think too much about such things. Maybe I'll rearrange one of them later. Maybe not.
Dark purple = 1 square 3.5 inches
Light purple = 2 rectangles 2 x 3.5 inches each
Light purple - 2 squares 2 inches each
Using two inch scraps of light and dark purple placed right sides together, use the easy angle ruler to cut 6 HST units.
Sew one light square to the right side of the other pair.
Pay careful attention to the direction of the HST units, it is easy to get them turned around.
Also sew HST units to one end of each light purple rectangles. Again, notice the orientation of the dark purple. Press toward the large purple square.
Sew the remaining light purple square to the HST end of the remaining long rectangle.
Rainbow Scrap Challenge Sampler - Framed Pinwheel
This one is a derivation from the basic grid! Shocking right? Most blocks are four patches nine patches or sixteen patches. I love that those can all come from a single strip size. Variety is the spice of life though, so here is something different.
 I used a light and dark green.
For the center pinwheel you will need 2.5 inch strips of both greens.
Sandwich them light sides together and use the easy angle ruler to cut 4 HST units.
From the dark fabric, cut 4 rectangles that are 1.5 by 4.5 inches
From the light fabric, cut 4 squares that are 1.5 inches
 Sew the HST units together, press and trim the dog ears.
Arrange and sew them into a pinwheel as shown. Twirl the seams and press.
 Next sew a dark rectangle to the top and bottom of the pinwheel
At the same time, sew a light square to each end of the other two green rectangles.
 A note about pressing. First, notice the "twirled" pinwheel in the center. This really does reduce bulk and help everything to stay flat. Next look at the center section with the seams going away from the center and the the two edges pressed with seams going toward the center. This will again help minimize bulk and allow the block to stay flat.
 Here is the finished block. You could easily use different colors for the center block, especially because the base strips are not all the same size. I think it would be cute with 3 or 4 fabrics, don't you? This one would be cute as a full quilt. It would give a nice four patch where the blocks come together in the corners.
For the center pinwheel you will need 2.5 inch strips of both greens.
Sandwich them light sides together and use the easy angle ruler to cut 4 HST units.
From the dark fabric, cut 4 rectangles that are 1.5 by 4.5 inches
From the light fabric, cut 4 squares that are 1.5 inches
Arrange and sew them into a pinwheel as shown. Twirl the seams and press.
At the same time, sew a light square to each end of the other two green rectangles.
Rainbow Scrap Challenge Sampler - Nelson's Victory
This is a 16 patch block which means that it uses 2 inch squares which will finish off at 1.5. They are laid out in a basic 4 by 4 grid.
 I used three greens, a dark, a medium and a light.
Start with 4 squares of each fabric, each 2 inches.
Next place your medium and light fabric right sides together and use the easy angle ruler to cut 4 HST units. Press these and remove the dog ears.
 The layout on this block is super cute. The center is a basic pinwheel. Then the squares are added to each side to extend the edges of the pinwheel. Clever right?
 This is my organized method of sewing blocks together. I learned it from Eleanor Burns of Quilt in a Day fame. First fold column two over on top of column one. Chain sew those blocks together without breaking the threads.
 Next sew each block from column three to the pairs from columns on and two. Again, chain piece without breaking threads.
 Repeat with column three
 Finish with column four. Now you have "pinned" your rows together with the threads of each column.
 Sew the rows together to make a beautiful little 16 patch. Cute right? And simple. My favorite kind of block.
Start with 4 squares of each fabric, each 2 inches.
Next place your medium and light fabric right sides together and use the easy angle ruler to cut 4 HST units. Press these and remove the dog ears.
Subscribe to:
Posts (Atom)