Wednesday, January 31, 2024

RSC24 Hen & Chicks Block 5 - Big O


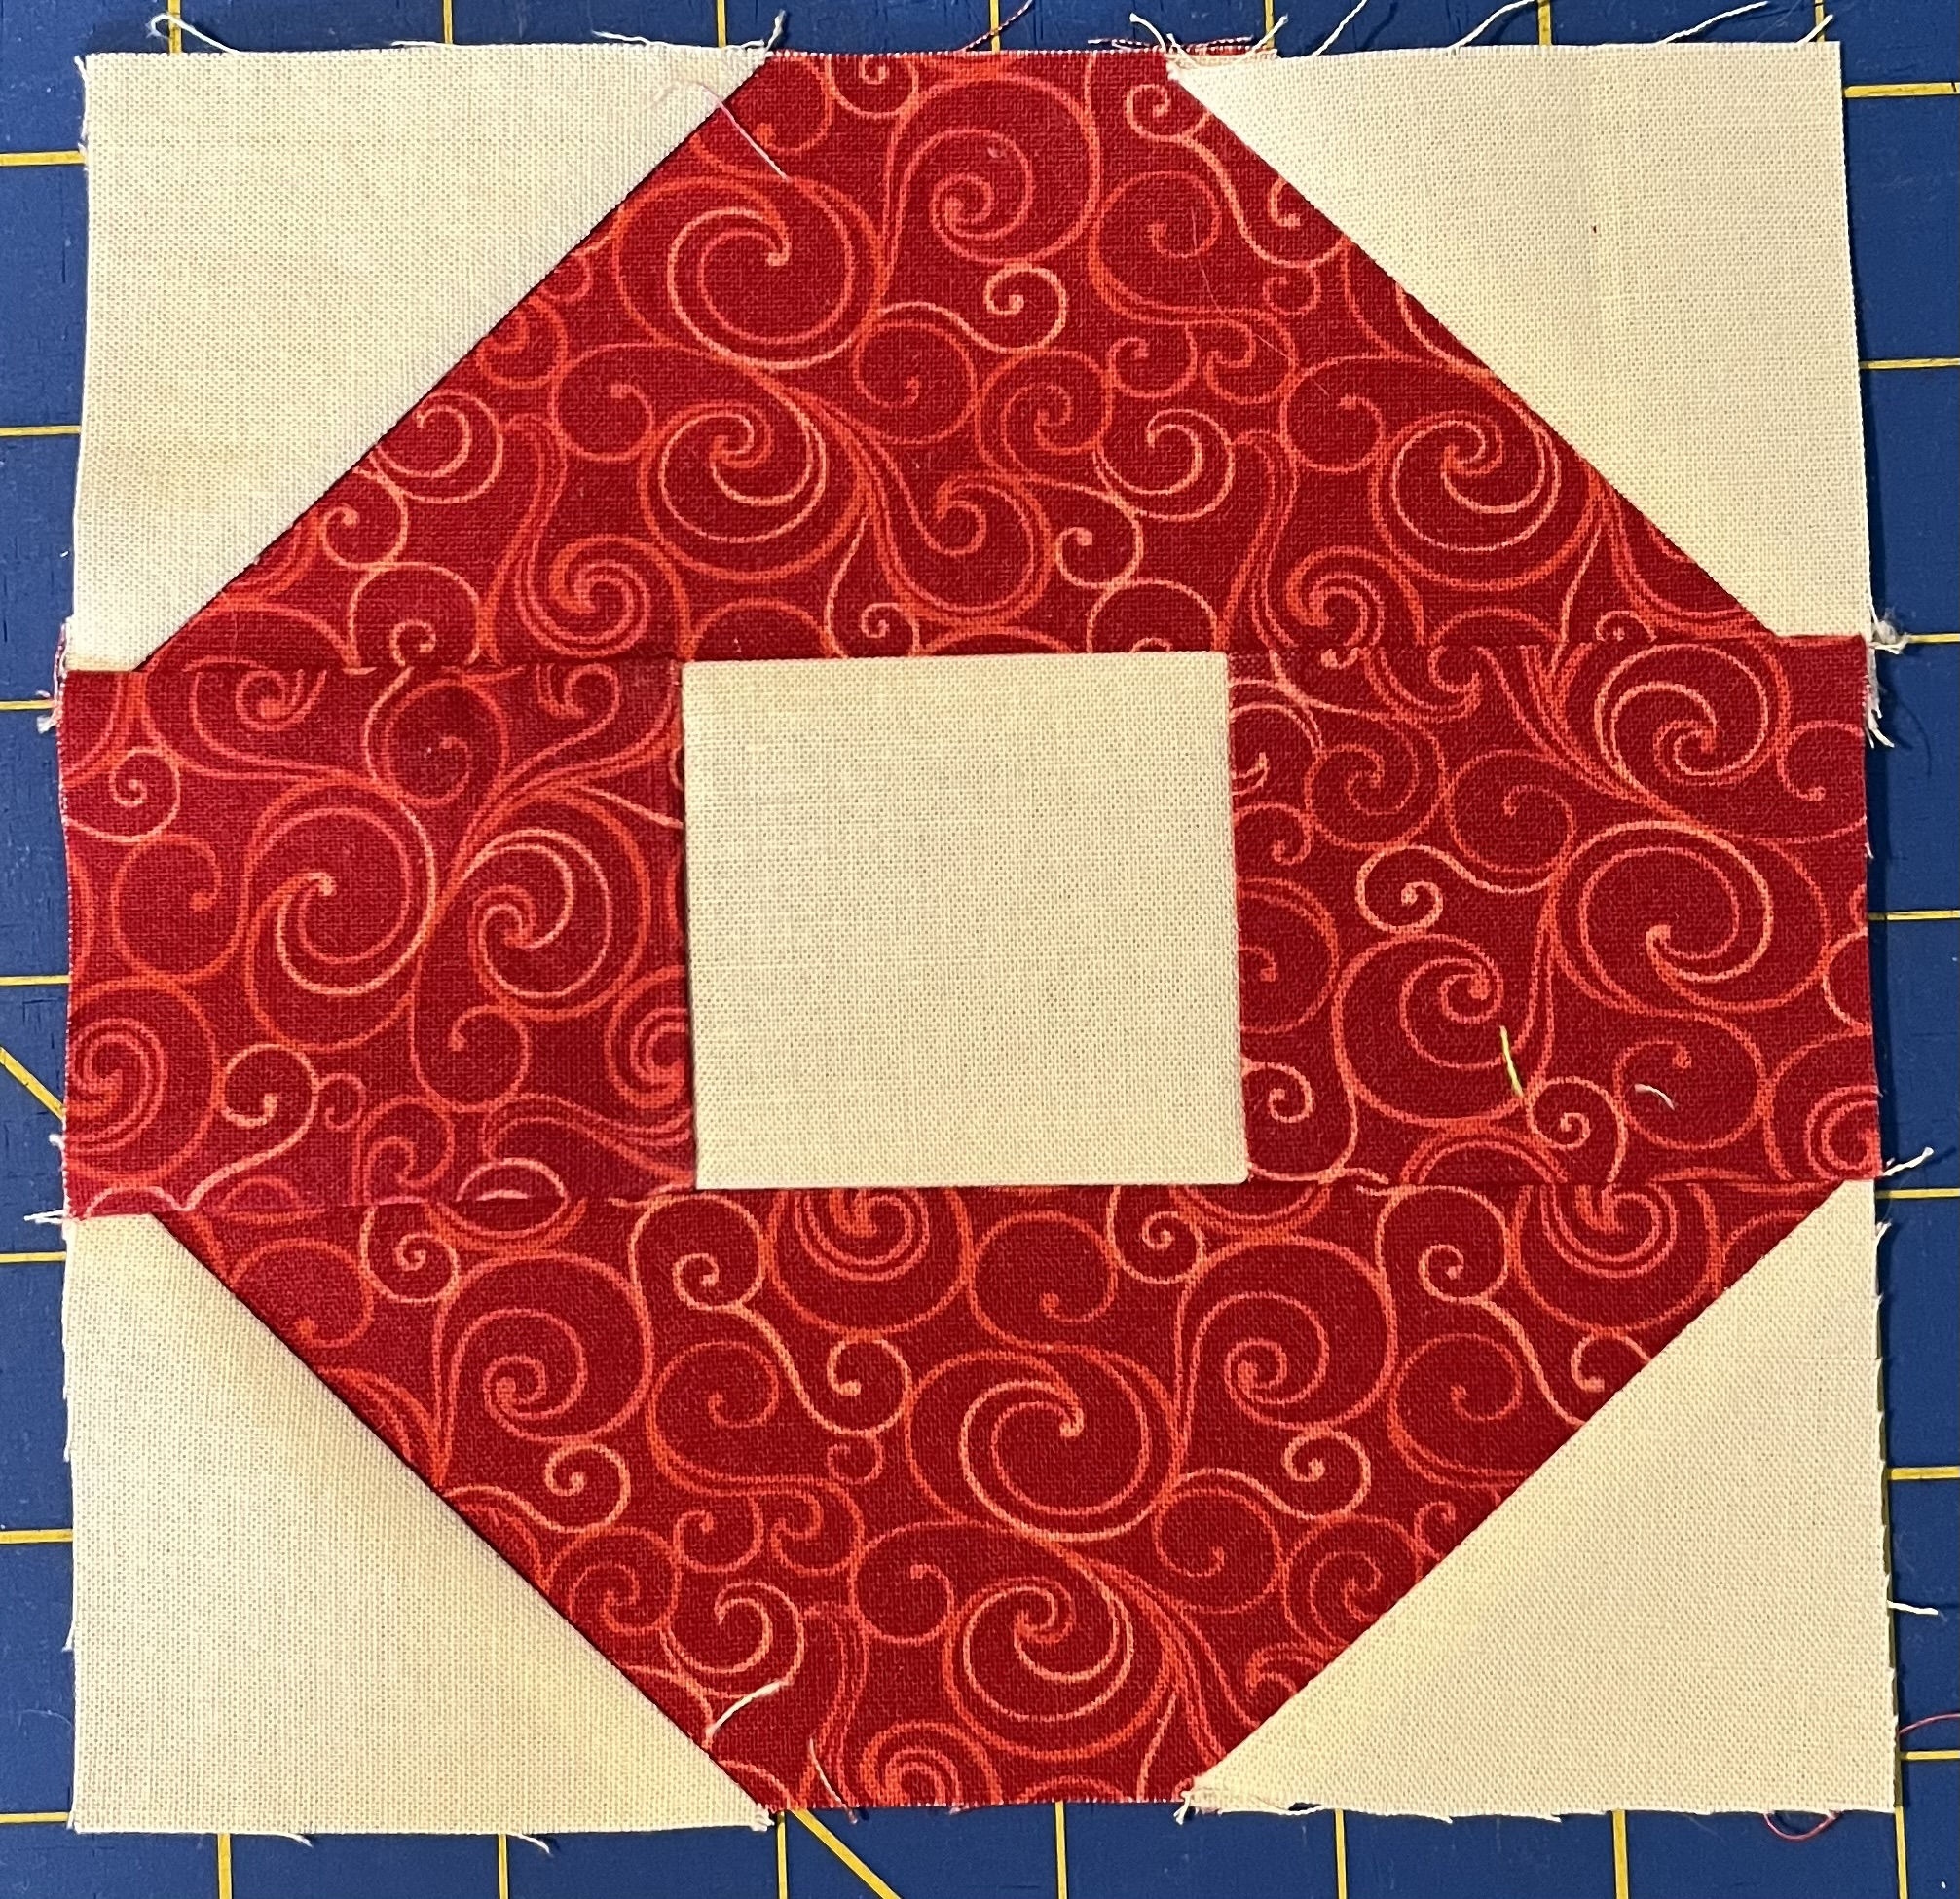
Big O is a simple block that forms a ring of color.  It could be pieced with squares and HST units, but given the uniform color plan, I will be using snowball corners with larger rectangles to minimize seams.  

Start with two rectangles and 7 squares based on the size of the block you want to make.  5 squares are background and two are from red.  
Take 4 of your background squares and draw a diagonal line from corner to corner.   
Arrange the squares so that the diagonal lines both angle up toward the center of each rectangle.  You may want to pin the squares in place temporarily, depending on the size of your block.  I pinned for the 6 inch block, but not for the 3 inch version.  Sew on the drawn line for all 4 squares.  If you like, you can double sew outside of the drawn line by half and inch in order to yield bonus triangles.  Again, I did this for the larger, but not the smaller block.     

Fold the background squares out toward the corners and press.  Even up any uneven edges and trim away the extra fabric layers below.  
Now arrange your center row with one background square framed by two red squares.  
Sew the three squares together and press toward the dark.   

Now sew all three rows together and press both side seams toward the center (it is better to minimize bulk in the diagonal seams than the straight seams).  

Saturday, January 27, 2024

ScrapHappy Saturday #4 2024


It is the last green Saturday!  It doesn't look like I have made a lot of progress, but I have a big stack of crumb blocks ready to be squared up.  I will pull out my Accuquilt Go this morning and see how many blocks I can add to the stack.  I also finished a dark green scrap bin to go with the light green bin.  I still need brown, black and maybe grey.   Check out my new rolling kitchen island!  My ironing board is too short and a bit cumbersome to take up and down.  Now that I have a dedicated sewing room I will use the island for both ironing and storage.  It is on wheels, so I can roll it out of the way when I am quilting. Another cold and rainy day in Florida, so there should be some quality sewing room time in my future.  How are your green scraps coming along?  Share your progress with us all and try to get things wrapped up so that we can all start digging into the red bin on Thursday.  


Saturday, January 20, 2024

ScrapHappy Saturday #3 2024

 Sadly, this is not a three day weekend, and so I will have to take advantage of both days fully.  It is going to be cold, but it looks like it isn't raining for the first time this year.  I hope that means I can get out for a walk.   

I have been working ahead on the sampler blocks, though of course I can't show any of those ahead of time.   That helped me get lots of green plus blocks done as leaders and enders.  The star blocks are from last year, and I am not super crazy about them, but I have SO many crumb blocks that this seemed like a good way to put them to use.  
How are your green scraps coming together this month?  Misterlinky is below, please keep us up to date on your progress.  


Saturday, January 13, 2024

ScrapHappy Saturday 2024 Number 2

 We have only been back at school a week, but it is already a three day weekend.   We have quite a bit of painting and organization to do around the house now that the kids are all gone again.   It looks like another rainy day, so inside jobs will be just right.


I've been working on green plus blocks as leaders and enders in between lots and lots of sampler blocks.  I am working ahead and so can't share any of those yet, but I am having so much fun crossing blocks off my list of even nine path blocks.   I do want to make a dark green scrap bin this month.  I have one for light green, but green is a big color for me, along with blue.  Having some extra space will helpful.   
How are your green scraps coming along?   Misterlinky is below, share with us all and then be sure to go and see what other RSC24 quilters are up so far this month.

Sunday, January 7, 2024

Slow Stitching Sunday - Hexagon Progress.


 It is only January 7th and the green row for my hexie diamond quilt is done!  It looks like I will need 5 more aqua blocks, so that should not take too long.  The rows are about 58 inches in length, and with borders will probably round up to 60.   I am starting to think about how I will square up the edges and border the quilt.   Then I will need to decide about brown, black and neutral rows.  I think it might be nice with a little more length, but there is time to figure that out as the rows continue to come together.     

I did a ton or organizing in the sewing room yesterday.  I had some extra drawer organizers that I bought for my desk at work.  Also some tiny boxes for pins and such.   I ordered a label maker, so soon I will remember how many kinds of pins I have.   The flat head ones seem to disappear, and I hate it when the short pins get mixed in with the long pins.  I have been trying to clear out everything from the old sewing room upstairs.  We took the two youngest back to school yesterday and getting the "guest" rooms back into shape again is going to be a process.  
The kids picked out a baby blue for upstairs when we moved in, and I have never been happy with it.   So far we have two shades of grey darker than the Balboa Mist that is downstairs, and one shade darker than the Sea Salt that is in the main bedroom.  It has been rainy here, so it is hard to get a good idea of what they will look like, but I will ponder the options for a while longer.  Today I will start with woodwork and touch up from things that got dinged in the hallways as we were moving things in and out.  I should be careful not to get too carried away as tomorrow is back to work day.  Putting on real pants and dress shoes again is going to be a big adjustment.   
Before I start to deal with all of that, I will have to go and check out Slow Stitching Sunday and see the other long and slow stitching projects in the new year.  


RSC24 Hen & Chicks Block 4 - Shoofly


Shoofly is one of those classic and simple quilt blocks that just can't go wrong.  It uses Half Square Triangle (HST) units which add so much variety to block layouts.  There are SO many ways to make HSTs.  I usually use an easy angle ruler because it lets you get the pieces you need out of the same sized strips you use for the other pieces.  So far, my easy angle ruler is seriously missing in action!  I ordered a new one which will be here on Tuesday, so today I used the method of cutting larger squares which makes to HSTs at a time.  The math says that you should cut squares 7/8 inches larger than the finished size of the unit you want.  I will admit that I just cut squares 1 inch larger so that I can square them up.  Squaring up in a sampler quilt like this when I am making a few units at a time.  If I was making hundreds of HSTs it would make me crazy. 


Here are the pieces you will need, use the cutting chart above to determine the size of the units you will need to cut.   
Start with the HST units.   Place the green and background squares right sides together and draw a diagonal line from corner to corner of the background square.  sew a quarter inch to either side of this drawn line and then cut the two units apart of the drawn line before pressing.  
Because I made my squares a full inch larger than the finished size of the final unit, I had a tiny bit of squaring up to do.  This gives nice perfect squares.  If you use the 7/8 inch size, you should just be able to trim off the dog ears and be good to go.  
Here are all the pieces ready to go along with the waste from trimming the HSTs.  You can see that it isn't too much waste in exchange for a perfect subunit.  


Now arrange your subunits into a nine patch with the HST units in the corners.  Make sure all the green triangles point to the center.  
Sew the columns and rows together, pressing away from the HST units.  

Here is the link to the PDF pattern, check out the RSC24 Sampler tab for links to all the patterns so far.


Saturday, January 6, 2024

ScrapHappy Saturday #1 of 2024

 Welcome to a brand new year of the Rainbow Scrap Challenge.  Where people come to find inspiration and motivation to use up scraps.  To avoid drowning in all the scrap happiness, we only sew with one color at a time.   A new year is a chance for many people to start new projects.  For some it is a chance to refocus and make a plan for finishing ongoing projects.  Please start this year by sharing your plan for using scraps in 2024.   If you have more than one quilt in the works, Stephanie has designed a Planning sheet available in a word or a PDF format.  You can keep track digitally or print out a nice color copy to track progress on your projects each month.   The links are posted on the RSC24 tab at the top in case you want to get it later.

I lost my life work balance last year and did not finish any of my new projects.  My main goal  for this year is to fill in the missing colors and put together some flimsies while quilting some of the backlog that has been waiting for me to have a dedicated space to set up my handiquilter on a permanent basis.  

My one new indulgence will be the Hen & Chicks RSC24 Sampler Quilt.  As the hostess, I won't have the luxury of procrastination and so will be sure to keep up with that one regularly.  I will try to work ahead on that one during school breaks, just in case.  I have the first 3 blocks ready to go and will finish up the last for January as soon as I can unearth my easy angle ruler this morning to make a few Half Square Triangle units.  There is a button for both the Sampler quilt and the Rainbow Scrap Challenge in the right hand column if you want a quick link to bring you back to this blog or to the Sampler Quilt page.   Just copy the HTML code below the image and paste it into and HTML widget in the side column of your own blog.  I spent way too many hours this week remembering how coding works because of changes in the photo sharing process of blogger since I did the process last year.   Any skill only used once a year is a bit iffy for me.
So welcome to those who are new this year, and welcome back to those who are returning after a scrap build up break from rainbow blocks.   We are sewing green this month.  I have enough green that I will be saving some of the more pastel shades for later.   How are your greens looking?  Misterlinky is below, please post a link to your post discussing green, scraps, rainbow quilts or plans for the new year.  Be sure to come back later to see what others are posting.  My best sources of inspiration are always seeing the beauty and variety of projects coming out of your scrap bins.    


Friday, January 5, 2024

RSC24 Hen & Chicks Block 3 - Rail Fence


Another easy block with greens.  It uses the same strip sizes as the postage stamp block, but with half the cutting.   I keep wanting to use some HST units, but so far my easy angle ruler is missing in action.  I know there are so many other ways to make HST blocks, I will have to use one of those if some studio organization doesn't turn the missing ruler.  It is even more embarrassing when I admit that I have two easy angle rulers and they are both AWOL.  


The width of your strip will depend on the desired block size.  I did the math for you in the chart.  To know how long the strips need to be, just multiply the sub cut length by the nine section you will need.  Those numbers seemed pretty long to me, so I divided each strip set into three sections to make everything a bit easier to manage.  Then I added in a bit of wiggle room in case you need to straighten up some edges.  Use the cutting chart above to plan, but feel free to adjust so that you can use your own scraps most efficiently.  

Start with three strips of dark and three strips of light.  The example block uses 1.5 inch strips that are 8 inches long.  

Sew the dark and light strips together and press the seams toward the dark fabric.  
Square up the end and then sub cut each strip into three sections.  The example block is 2.5 inches which should be the same as the width of the strip set.  
After cutting all three strip sets, you will have 9 sections.  
Alternate them with the seams running horizontally then vertically keeping the green on the bottom and right of each set.  You could also keep the green on the top and left, the key is to keep a consistent orientation of the colors so that you get a stairstep effect when the blocks come together.  
Sew the sections together as you would any nine patch and press the top and bottom seams toward the center and the middle row away from the center of the block.  


Link to PDF of Rail Fence Pattern


RSC24 Hen & Chicks Block 2 Bowtie


The Double Bowtie Block is just a nine patch with a few snowball corners thrown in.   You will need 4 large squares of green and 5 of background for the nine patch.  For the snowball corners, you will need 4 small squares of green.   The size of your large and small blocks will depend on the block size you are making.  Please refer to the cutting chart below.  Quantities for each square are indicated in parentheses in the column header.  
I did a 3 inch and 6 inch block, as well as one accidental 5 inch block because I failed to read my own cutting chart properly.   As I started putting blocks on the wall, it occurred to me that it would be easy enough to pair 4 6 inch blocks together to alternate with a 12 inch block.  There are so many possibilities!    I framed out the bonus 5 inch block and squared it up to 6 inches so that it will go into the block mix. It just seems more useful than tossing it into the orphan block drawer.   

Start by drawing a diagonal line on the back of the small corner squares for sewing.  

Two background squares need one corner, and one background square will need 2 opposite snowball corners.  Refer to the photo for the layout.  Dark squares will go in the center of the edges while background squares will go in the corners and the center.   


With right sides together, sew the snowball corner on the drawn line.  I like to go just a touch to the outside edge of the line to give the fabric a little wiggle room.  Open the corner and press flat before checking the back and trimming away any extra green fabric.  
Then trim away the bottom triangle, leaving a quarter inch seam allowance.  For larger block sizes, I like to make bonus HST blocks out of these, but I didn't for these smaller blocks.  
Then your squares go back together as they were and you can check the layout before sewing as you would any nine patch.  I like to flip the second column onto the first column and then sew the vertical seam continuously before adding the third column.   I call this the quilt in a day method as I think  that is where I saw it first.  

When sewing the rows together, the seams in the center block are the bulkiest, and should be pointed away from the center of the block.  That will put the top and bottom rows with seams facing in  The final press will again press seams away from the center.  That should let your block like nice and flat while reducing extra bulk in the seam allowance.  

I have some and google doc versions of the patterns in a printable format that I am working on, please check out the RSC24 Sampler tab at the top for a complete list of links to pattern pages.  

Here is the link to the PDF for this pattern: Double Bowtie Block


Thursday, January 4, 2024

RSC24 Hens & Chicks Block 1 Small - Postage Stamp


The small Postage Stamp block is quite similar in construction to the large version.  You will need 6 strips that are 1 inch in width.  Hard to believe that half an inch could make such a difference.  It is all in the seam allowances!  Each strip needs to be at least 6 inches long.  You will need 3 green and 3 background.  

Pair the strips and sew, making sure to keep an even seam allowance and to press without curving the strip sets.  Press toward the green.  

When sewing the pairs together, the quarter inch seam allowance should exactly but against the quarter inch edge of your presser foot, if that is what you are using.   

Continue the rest of the block assembly in exactly the same way as you did for the larger version.  I am thinking that I will make one PDF version of the pattern with 3 block size options and maybe a nice little chart for cutting sizes.   Let me know what you think!

Here is the link to the PDF Version of the Pattern for Postage Stamps

RSC24 Hen and Chicks Block 1 Large - Postage Stamp


The "large blocks for Hen & Chicks will finish at 6 inches.  I know that isn't exactly huge.  You could also make 12 inch blocks easily enough by substituting 2 inch strips for the 1.5 that I am using.  By working on a consistent 3 by 3 grid, the math will be pretty straight forward for whatever size you would like to make.  I will be back shortly with the smaller version which will finish at 3 inches.   Start with 1.5 inch strips of fabric in green and background.   They should be at least 9 long.  10 inches will give you a bit of wiggle room.  
Pair the strips and sew together into three sets of light and dark sets. Press toward the green.  
Now sew the sets together to get a large strip set, pressing again toward the green.  The width of the entire set should be 6.5 inches.  Try to keep it as strait as possible.  
Next, rotate the strip set 180 degrees and sub-cut into 1.5 inch strips.  You will need 6 sets.   

Rotate every other set so that the white and green blocks alternate in a checkerboard like grid.  
Sew the pairs together, matching up the seams.   This is easier if the seams on the top are going into the feed dogs first so that the sewing helps things nestle snuggly.   
Sew the three pairs together and take some time to open up the corners so that the seams lie as flat as possible.   

 There you have it, a 6.5 inch postage stamp block. It will finish at 6 inches in the final quilt.   Come back shortly for the tiny version and stay tuned for a nicely organized PDF file as well.