Thursday, January 31, 2019

February is Yellow

Yellow might seem like a bit of a bright and happy color for such a dreary month, but I am hoping that it will bring a little warmth to us all.  

Tuesday, January 29, 2019

Tiny Tuesday #5


Cynthia Brunz at Quilting is More Fun Than Housework is our guest designer in this last Tiny Tuesday for January.  Perfect for red and just in time for Valentines Day, she has posted a tutorial for a  Heart ❤️ .  There is a PDF file available here.  Thanks Cynthia for such a sweet little block!
This one will be set straight.  We are alternating straight and diagonal, hoping to end up with an equal number of both at the end of the year.

Sunday, January 27, 2019

Scrap Sorting Box

As promised, I worked up a tutorial for the fabric scrap boxes.  Please let me know if anything is unclear or if you need any additional pictures.  
Gather together your scraps.  I'm working with yellow this time, but choose your color and then gather together everything that you think might work.  Leftover triangles, odd ends from strip sets, orphan block, anything goes!  In addition to the crumbs and strings, you will also need a few larger bits for lining.  Don't worry about choosing your prettiest scraps for these, they won't show.  
 First step: make fabric.  Start with small bits of fabric and leftover chunks of whatever you have on hand.  Sew similar sized units together and then sew those to others.  Keep going until you run out of bits that fit together nicely.  Straighten up an edge and then use a long strip of fabric to join two of these chunks together.  You are aiming for two rectangles about 8 by 11 and two squares of about 8 inches.  Keep that in mind so you don't go overboard and make enough fabric for an entire quilt.  Press and straighten edges with a rotary cutter as you go to keep joining chunks together.

 When you have two squares and two rectangles of crumb fabric ready to go,   dig into your batting scraps to find some batting to cut into two squares and two rectangles as well. They are about the same size as the crumb fabric you just made: 2 rectangles 8 by 11 inches and two squares 8 by 8 inches.    Try to find a batting scrap that is fairly flat and even.  Warm and natural works well or something low loft -- heavy on cotton and light on polyester.  Everything so far is slightly over-sized, so don't worry if it isn't quite perfect.
 Layer the batting with the crumb fabric, wrong sides together.  You can trim them to the same size now or later.  The lining comes later, so it is just a two layer quilt sandwich for now.
Secure your quilt sandwich together with a few straight pins as a very temporary measure.  You will be quilting these and each is quite small, so the pins won't be around for long.  Please don't poke yourself.  Use safety pins instead if you are accident prone.
Quilt  each section as desired.  I like to use a matching thread and just go crazy with lots of different quilting patterns.  You can use a walking or darning foot if you have them.   Feel free to try out the fancy decorative stitches that come with your machine.  If you don't have any of these, don't worry.  My main machine is in the shop right now, and I quilted these up with a regular foot on a cheap backup machine and had no problems.  Just work from one side to the other methodically and smooth the fabric as you go to avoid puckers.  With just two layers, shifting and puckering shouldn't be too much of a problem.
Now that you have made your quilted fabric, you are ready to cut out the rest of your pieces.

1.  Square up your quilted crumb fabrics:  2 rectangles 7.5 by 10.5 and two squares 7.5 by 7.5.
2. Cut your lining fabrics to the same sizes : 2 rectangles 7.5 by 10.5 and two squares 7.5 by 7.5
3.  Cut two rectangles for the bottom inside and outside, they are also 7.5 by 10.5.  
4.  Cut one extra piece for the handle, it is 6 by 7.5
5.  One piece of firm cardboard or foam board which is cut 7 by 10 inches.  

A note on sizes.  This pattern can easily be modified to make a box in any size.  I looked at the shelf where I wanted the boxes to go and figured out what I thought would work there.  I've made smaller cubes before and they seemed too small to hold a decent amount of scraps.  Though they work great for notions and supplies.  Make something that will work in your space to hold the things you want to put in them.

Prepare the handle by folding two edges a quarter of an inch.  Press
Fold the top and bottom in to meet in the middle.  Press.  Fold in half again and stitch each end to hold it all together temporarily
Pick the prettier of your two quilted squares and call it the front.  Pin the handle so that the edges are about 1.25 from each edge.  Center it top to bottom.
Sew the handle down by making a square around each end and add another X down the center for added stability.
Sew the short end of each rectangle to the side of a square.  This well be sewn to the bottom, so it is important NOT to sew all the way to the bottom edge.  Stop a quarter of an inch before the edge and back-stitch.
Continue to sew the sides together until you have a tube with two squares and a two rectangles.  Make sure that the handle is oriented sideways -- not up and down.
Now the tricky part -- pin the bottom to all four sides of your quilted fabrics.  The corners should nestle in because you didn't sew the sides all the way to the bottom.  The right side of the fabric is facing to toward the right side of the quilted fabrics which are all on the inside of the box.   Match the raw edges together and pin liberally.
Start in one corner on a long edge, a quarter of an inch in from the end and sew straight down, stopping a quarter on an inch away from the other end.  Back stitch and remove the box from the sewing  machine.
Fold the sewn edge out of the way and line up the next edge, making sure that the raw edges are lined up and the corner not bunched under the sewing line.

Start where your stitching line stopped on the last seam.  Your stitching should not go out into the corner.  Repeat for the remaining sides.
Here is your finished box.  It is right side in, but you can see how the corners work.  
Repeat the above procedure for the lining fabric.  
Sew the two ends to the two sides and sew those together to make a tube.  Don't forget to stop sewing a quarter of and inch before you get to the bottom.  This will be somewhat flimsier than the outside, but the sewing is the same.  
Finally, sew the bottom inside to the sides of the lining fabric.  This works exactly the same as the outside bottom with one important exception.  Leave a large gap (at least 7 inches) along one long edge to insert the cardboard base and to turn the whole box right side out again in the end 
 Before any turning happens, we need to sew the inside and outside together.  With right sides together, nestle the lining box inside of the quilted box and pin the raw edges together.
 Sew all around the pinned edges, making a large circle.  Keep going until you get back to where you started.
 When you come to the corners, finger press the seams open and sew them flat to reduce bulk.

Now the moment of truth!  Turn the whole thing right side out by pulling everything out through the long gap that you left in the lining.  Poke out the corners to make them pointy and trim away excess bulk if you need to.  Press the top to make a nice crease where the inside meets the outside.  Stitch along the top edge about a quarter of an inch from the edge to add some stability and shape.  
Now is the time to insert the cardboard base.  Go ahead and tuck it in and take some time to get it nestled nicely amongst all of your seams.  You will need to sew up the gap that you left at this point.  Usually I would whip stitch by hand, but given that this is the inside and won't really be seen, I just fold a fake seam allowance under and sew close to the edge.
Now sit back and admire your box.  Find some scraps to fill it up

These make such a happy collection sitting together on a shelf.  Hopefully by the end of the year I will have a whole rainbow to enjoy.  

Crumbly Sunday

 I've been finding time in the evenings to slow down and enjoy some hand stitching.  Maybe because it has been unusually cold for Florida, or maybe because the husband was out of town all week?  Whatever the reason, I was able to finish off the first two months and get started on the third.  It was nice to switch to pink after so much green.
 I was also able to finish up another scrap storage bin in yellow to add to the collection.  I even took pictures along the way so that I can make a tutorial!  I have to take Sydney into school this afternoon to work on her science fair project, so I think that I'll work on it then.  I feel like I need to move up the handles on the blue and green bins so they are more centered.
I've even got the crumb fabric made for an orange version.  I was in the process of quilting it when life started happening around here, but I'll try to get back to it soon.  We were out looking at house again yesterday.  I think that we are starting to narrow things down now.  Before I get back to sewing this morning, I'll  check in at Oh Scrap! and Slow Stitching Sunday.  

Saturday, January 26, 2019

ScrapHappy Saturday #4

I finally decided on a background fabric for my Tiny Tuesday blocks.  It was a busy week, so there wasn't time for much more than that.  Today is the last red Saturday, but there is still one more red Tuesday, so be sure to check back for the last red block. 


    An InLinkz Link-up
   

Tuesday, January 22, 2019

Tiny Tuesday #4


Angie at Quilting on the Cresent was kind enough to post a tutorial for this week's block.  It is an adorable 3-dimensional bowtie block.  Check out her post for directions or look at the PDF file here or on the RSC19 Sampler tab.  This one should be set on the diagonal.  Use the instructions for that are also on the RSC19 Sampler tab.  

Monday, January 21, 2019

Long Weekend

It was so nice to have an extra weekend day.  I did a bit of sewing and cleaning, got a haircut.  All sorts of nice weekend things.  This evening I started ironing interfacing onto the back of Ryan's shirts for his graduation quilt.  So far I've finished the front and back of shirts for grades one, two and three.  I have to keep the backs, that is where their names are.  I'll have Ryan sort through some of the shirts.  I think that there are way too many.  Some of them are just ugly, and some of them probably aren't that important to him.  The ones with the little names on the back are important to me.  Those are definitely going to stay. 
It is so cold here that I had to turn on the heater!  It makes me just want to curl up in bed and stay put.  I felt that way every day of winter when we lived up north.  Kurt is in DC and it was hovering around 0 when he landed.  Brrr!  Glad that it is him and not me. 
I think that all the links are up to date on the RSC19 Tiny Tuesday Sampler blocks.  There is one scheduled for the morning, but the PDF is available on the RSC19 Sampler tab right now.    

Saturday, January 19, 2019

ScrapHappy Saturday #3

 I've got a few string blocks to add to the growing collection of red this week.  One more sprout block and few donut 16 patches that I found while clearing out a bin.  I need to frame my Tiny Tuesday blocks so that I can add those as well. 

 First, I need to start on a shirt pillow that I promised to make for a work friend who's husband passed away this summer.  She wants to send it with her youngest daughter who is returning to college next week. 

I hope you had time on Tuesday to check out our third Tiny Tuesday block.  It is available as a blog post or as a PDF.  It is a straight set block.  Directions for that are here and here.
Let us know about your plans and progress as the red month moves closer to the end.  The linky tool is below,
    An InLinkz Link-up
   

Tuesday, January 15, 2019

Tiny Tuesday #3


I'm so excited to welcome our first guest designer this week.  Sally Trude blogs at The Objects of Design, and she always has adorable animals coming to visit.  She has been working on kitty blocks for several quilts now and has been kind enough to rework one into a 4.5-inch finished size for Tiny Tuesday.  Be sure to check out her micro cats if this seems too big for you.  Here is a link to her block tutorial and another link to the PDF file.  I'll post links on the RSC19 Sampler tab as well when this post goes live on Tuesday.  This one needs to be set straight, otherwise, the poor kitty would be quite confused.  Be sure to come back on Saturday for ScrapHappy Saturday to see some finished kitties coming out to play. 

Sunday, January 13, 2019

Still Tidying in Sunday

 The new year cleanup continues! I started to look at quilts and freshened up the quilt rack on display a bit.  My favorites live here.
All the others were stacked awkwardly in the master bedroom closet.  It was hard to know what was there or to get to it at all.  I tried rolling them, we'll see if that makes it easier to access particular quilts.  The corner closet organizer isn't the ideal arrangement, but at least there is plenty of space. So the master closet is done, along with the space under the sinks.  That leaves the drawers and the linen closet.  Slowly, I will get to it all.  The girls needed to go shopping this afternoon and I was ready to rest by the time we finished all the running around.  

I am so ready now to settle in for the evening and get a bit more done on my August block from Leap Year.  I tend to have several threads going at any one time as I work my way down and across each month.  The quilting pattern is pretty simple and straight forward, and the Pearle cotton goes really quickly too. Maybe this won't be another 3-year hand quilting project.  Head over to Kathy's Quilts to check out other hand quilting projects.  

Saturday, January 12, 2019

ScrapHappy Saturday #2

I hope you are all off to a great start with RSC19.  I know I've been spending some time sorting and organizing, I'm sure I'm not alone in my preoccupation with having things tidy at the start of a new year.
There has been some sewing too of course.  As soon as all the scraps were organized it was time to put some of them into blocks.  The 2.5-inch squares went into scrappy sprouts blocks.  I really like how they came together.  This block has been on my list for quite a while now.  I think that I will need about 5 of each color to have enough for a nice sized quilt by the end of the year.  Then the 2-inch squares went into some 9 patches which I framed in alternating black and white.  Each color will make a column of 10 blocks and 8 colors should be enough for a quilt.  I might combine orange and yellow.  I never seem to have much orange on hand.  I'm just starting on the strings, so that might be my project for the afternoon.  We have been looking at condos and townhouses on the beach and are meeting with a realtor after lunch.  It is starting to sink in that we will have only one child left in the house when school starts again next fall.  Where did the time all go? 

Be sure to check out the second Tiny Tuesday block.  It is applique.  Don't be afraid to try it.  They are just scraps after all.  Everything that seems hard now will be easier with practice.  I'll try to introduce several methods of applique prep this year.  You just never know what you might end up enjoying.  There is an ongoing list on the RSC19 Sampler tab in case you are looking for a specific block. 


    An InLinkz Link-up
   

Thursday, January 10, 2019

New Year Projects


I've been on a bit of an organizational spree lately.  There was the pantry, then the spice cabinet.  Yesterday was the closet in the master bedroom.  This usually happens to me around this time of year.  Obviously the sewing room could not be left out of all the fun.  
 I had just finished making new nine patches in red for this year's 2 inch rainbow scrap project when I realized that I already had lots of leftover nine patches from last year.   So I started by sorting those.  Many of them were monochromatic.  They will all be put to good use with no problem.
 But then there were all these mixed color blocks.  I think that there are enough here for a quilt.  I just need to decide on setting.  I'm thinking two solidish colors to tie it all together a bit.  Maybe red and blue?  I could go with red and green and call it a Christmas quilt.
There were also these partial blocks which I wanted to use for something interesting.  
I decided to reconfigure them into the beginnings of a Double Irish Chain.  
 I also made it out to the Hundred Acre Hollows at the beginning of the week to help train some new people to monitor the camera traps.  It had fallen off of the bottom of my priority list lately.
School is finally back in session again and I'm afraid that the sewing will slow considerably.  It will be as big of an adjustment to me as to the kids to have to do work again.


Tuesday, January 8, 2019

Tiny Tuesday - Block 2

I'm trying to work in some applique blocks this year.  I know that not everyone likes applique, but we will start with something nice and easy.  Just a circle.  There are A LOT of ways to do applique.  I'll show you a few options as we work through the first simple blocks, but you should feel free to use the technique of your choice.  

 Rather than fussing with a printed template right away, you need to find something circular to use as a pattern.  Something with a diameter between 3 and 4 inches will work perfectly.  I found a drinking glass that worked form me.  In addition, find some light cardboard to use as a template
 Trace the circle onto your cardboard.  Mine ended up at 3.75 inches.  Cut it out on the drawn line.
 Now find a scrap of fabric that is just slightly larger than your template.  Use a pencil or erasable pen to trace the shape onto your fabric.
 Trim the fabric a quarter of an inch outside the drawn line.  No need to make it perfect.
 With a hand sewing needle and heavy thread, run a gathering stitch around the outside of the drawn line all the way around the circle.
 Place the cardboard circle on the wrong side of the circle and use the thread to draw up the edges evenly around the template.
 Use an iron to press the circle.  You may use spray starch or sizing if you like to keep things firm.
 Turn the circle over and press on the other side to make sure that you have a nice sharp crease.
 Temporarily pin your circle down to a 5 inch square of background fabric.  You can sew the circle down by hand or machine.  I like to use a nice small blind hem stitch.  You could try a blanket stitch if your prefer.
 When the circle is sewn down, turn it over and trim away the background fabric behind the circle to reduce bulk.
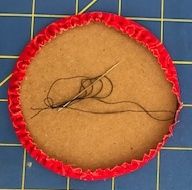
Here is your finished circle.  Block #2.  If you are adding the setting fabric now, use the directions for a diagonal setting located on the RSC19 Sampler tab.  I'm still waiting for my background fabric to show up, so I'll catch up to that part soon.