And so the lack of sewing time will continue for at least a few more weeks. The big career day is next Friday and then I am off to DC to celebrate our Blue Ribbon award. We had planned to take a long weekend after that to spend some time in Virginia, but Kurt's uncle Bob passed away and so we will go straight from DC to Ohio for his memorial. After all of that though, there should be a period of calm. I say that with hope in my voice. This weekend though, we are camping on a sailboat in the keys and I can't wait to do nothing for a few days. It will be good for me to breath for a few minutes right now. I hope you are having lots of sewing progress to share with everyone.
Friday, October 25, 2024
Saturday, October 19, 2024
ScrapHappy Saturday - Post Hurricane

I made it back safe after the hurricane and spent a busy week getting caught back up again. I say that as if things are going to be calm after we get back to normal. It is just a busy time. Busy with all sorts of fun though, so I will not complain. I still need to move all the patio furniture back outside after the hurricane. Then I will finally be ready to get some use out of that new chair.

The power was out for four days while we were evacuated, so that led to a massive cleanout of the fridge. Kurt just got back last night, which means I didn't do a lot of restocking yet. How are your final few blocks coming together? I am looking forward to seeing other people be productive even if I haven't been busy in the sewing room lately.
Saturday, October 12, 2024
ScrapHappy Saturday - Retreat

We are enjoying a long weekend in the mountains far away from the hurricane. The power is back on at home, but internet isn't up quite yet. There was no damage to our place which is on the east coast, well away from where Milton entered the state. That gave him plenty of time to simmer down a bit.
Apples are ripe here and the kids picked a few which need to be peeled and turned into some apple pie filling and applesauce. I keep thinking that we should try some apple cider, but that needs a machine to do on a large scale. Our attempts at homemade wine have been hit or miss so far, but we will keep trying until something works.

The cat has been hanging out on a quilt next to a window as cats love to do. There are birds and squirrels to spy upon. I am also enjoying some time relaxing, though there is a fallen tree just calling my name that is ready to turned into some firewood.
Friday, October 11, 2024
Hurricane Update

Anna and her fiancé Jordan are both here with us. They are still under a boil water alert in Blacksburg after Helene. What an eventful few weeks! They brought the cat with them, and she loves being at the cabin. We have picked some apples and this afternoon will attempt to can some apple pie filling.


The power was out for most of yesterday back at home. I think that the internet is still down, but there isn't any visible damage. Milton exited in the north end of our county. We live in a very long skinny county, so it never ended up getting too close to where we live. There was some beach erosion of course, and some isolated damage from tornadoes, but far from the worst case scenario that it could have been. Jordan grew up in Bradenton, very near where the storm came in to Florida. Still, the fact that it came in south of Tampa was lucky, it could have been so much worse.
I told Kurt as we were packing up to leave that he should make sure that I didn't forget to bring my sewing. Of course we both forgot and my hexies are hanging out at home. I have plenty of school work to keep me busy, but it sure would have been nice to stitch away at hexies while in transit. I hope that everyone else is safe and dry. I will remember to post scraphappy Saturday first thing tomorrow. Hopefully Kurt will do a better job and helping me remember this time.
Saturday, October 5, 2024
ScrapHappy Saturday
Can you believe that it is almost the end of the year? October is the time to start thinking about how you can make a plan to finish some things up before the end of the year. You can add more dark blocks to your collection if you weren't able to use up a good number last month. This was my choice as I focused on black last month and brown this month. If you are not feeling quite so happy about walking on the dark side, then this is a chance to delve into the low volume and light basket. If none of those options appeal to you, then you can look back at your block collections and figure out what you need to use up or add to your stacks to lead to a finished quilt in the next couple of months.
My sewing time will be scarce this month. I have three graduate classes and one of them seems like a lot. There is also the career exploration fair coming up on November 1 which is a big thing that I need to put together. It is also the most busy time of year for college applications, which has me sitting down with so many seniors every day and really feeling like I am helping them get all the parts past the finish line. And breath! 

I did get my new chair delivered yesterday. Look how comfy it is going to be. I can't wait to settle in and sew some hexies this afternoon. Just one more paper to write first for my research class. This one looks pretty straight forward compared to the monstrosity that was my curriculum paper. It is done now and I am moving on. Did I mention that the thing in the gulf just turned into a real storm? I hope it doesn't take us out of school on Wednesday, that is our PSAT which is a big deal for my students. We were pretty lucky on this coast last time, but Tampa is not going to be in good shape if the forecasts turn out to be accurate.
Tuesday, October 1, 2024
Hen & Chicks October Block 4 - Forty


Block number 40. The last one! This one is fittingly called forty, it is made of four "T"s.

Actually, it is made of flying geese, but the arrangement forms the letter T in each corner. Use your favorite method 4 HST units. You know that I used the Easy Angle ruler, but the chart has measurements for the square method. I am using flip and sew triangles for the flying geese again this time. Not what I would do for a larger size block, but it does make the math easy.

Draw a line on the diagonal of each small brown square. Place it right sides together on one end of each background rectangle.

Sew on the drawn line, flip and press before trimming away the extra fabric beneath.

Repeat on the other end of each background rectangle for a total of 8 flying geese units.


Arrange the geese pairs along the edge and point the white goose bodies toward the center square. Go ahead and double check so that you don't sew the whole block together wrong like I did. (Unsewing is so much less fun than sewing!).

You don't really see the serifs on the Ts until it all comes together. I suggest a fabric with a nice strong contrast to get the full effect. That's it. Our last block. Done!
Congratulations!!!!
Hen & Chicks October Block 3 Tower's of Camelot


I loved the inverted star look of this block. Then I accidentally rotated the QST units in the smaller version and all of the sudden it was a diamond. The smallest changes in fabric placement and value can make such an impact in the final look of the block. I am not sure if I am going to remake the second block or not. I kind of like it!

You will use the small grey squares to snowball all 4 corners of one of the background squares. The other background squares get a diagonal line, and then are placed right sides together with 4 of the HST units. Make sure the seam and the line are perpendicular to one another.
Sew on the drawn line and then flip open your square to reveal a quarter square triangle. Press and trim away the extra fabric beneath. I know this creates some waste, but it is simpler than doing the math for the two at a time method and then having seams running in different directions on different blocks.
Pay special attention to the orientation of the units here. I speak from experience, as I have two different blocks based on a simple rotation that I didn't even notice until after the block was sashed and hanging on the design wall.
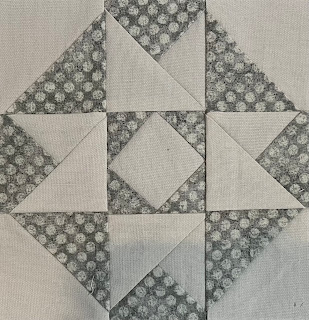
Here is your finished block. I really do enjoy this one, it is subtle, but effective.
Hen & Chicks October Block 2 - Dandy


Yet another star block. This one is easy to assemble with sew and flip triangles and corner triangles frame the block nicely.

Use the method of your choice to make HST units. Everything else is just a square. I used a light gray for the corners and a darker gray for the star points. The center square can be dark or light gray.


Draw a line along the diagonal of each small gray square and place in one corner of each background square. Flip, trim and you have one star point.


You will have 4 star point blocks along with 4 HST units and a center square of your choice.
Put them together with the star points all touching your center square and the HST blocks in the outer corners forming a frame.

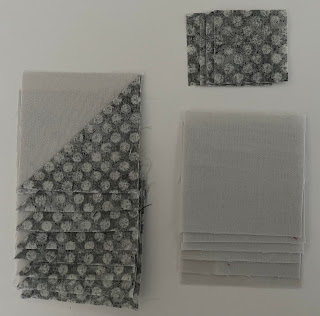
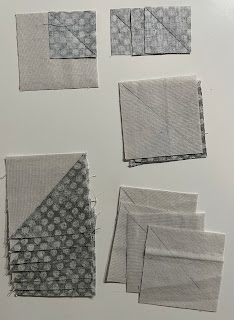
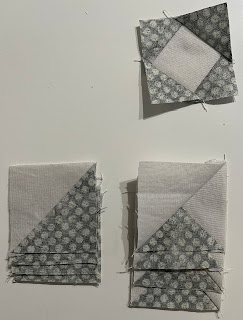
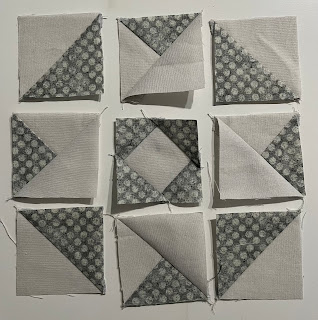
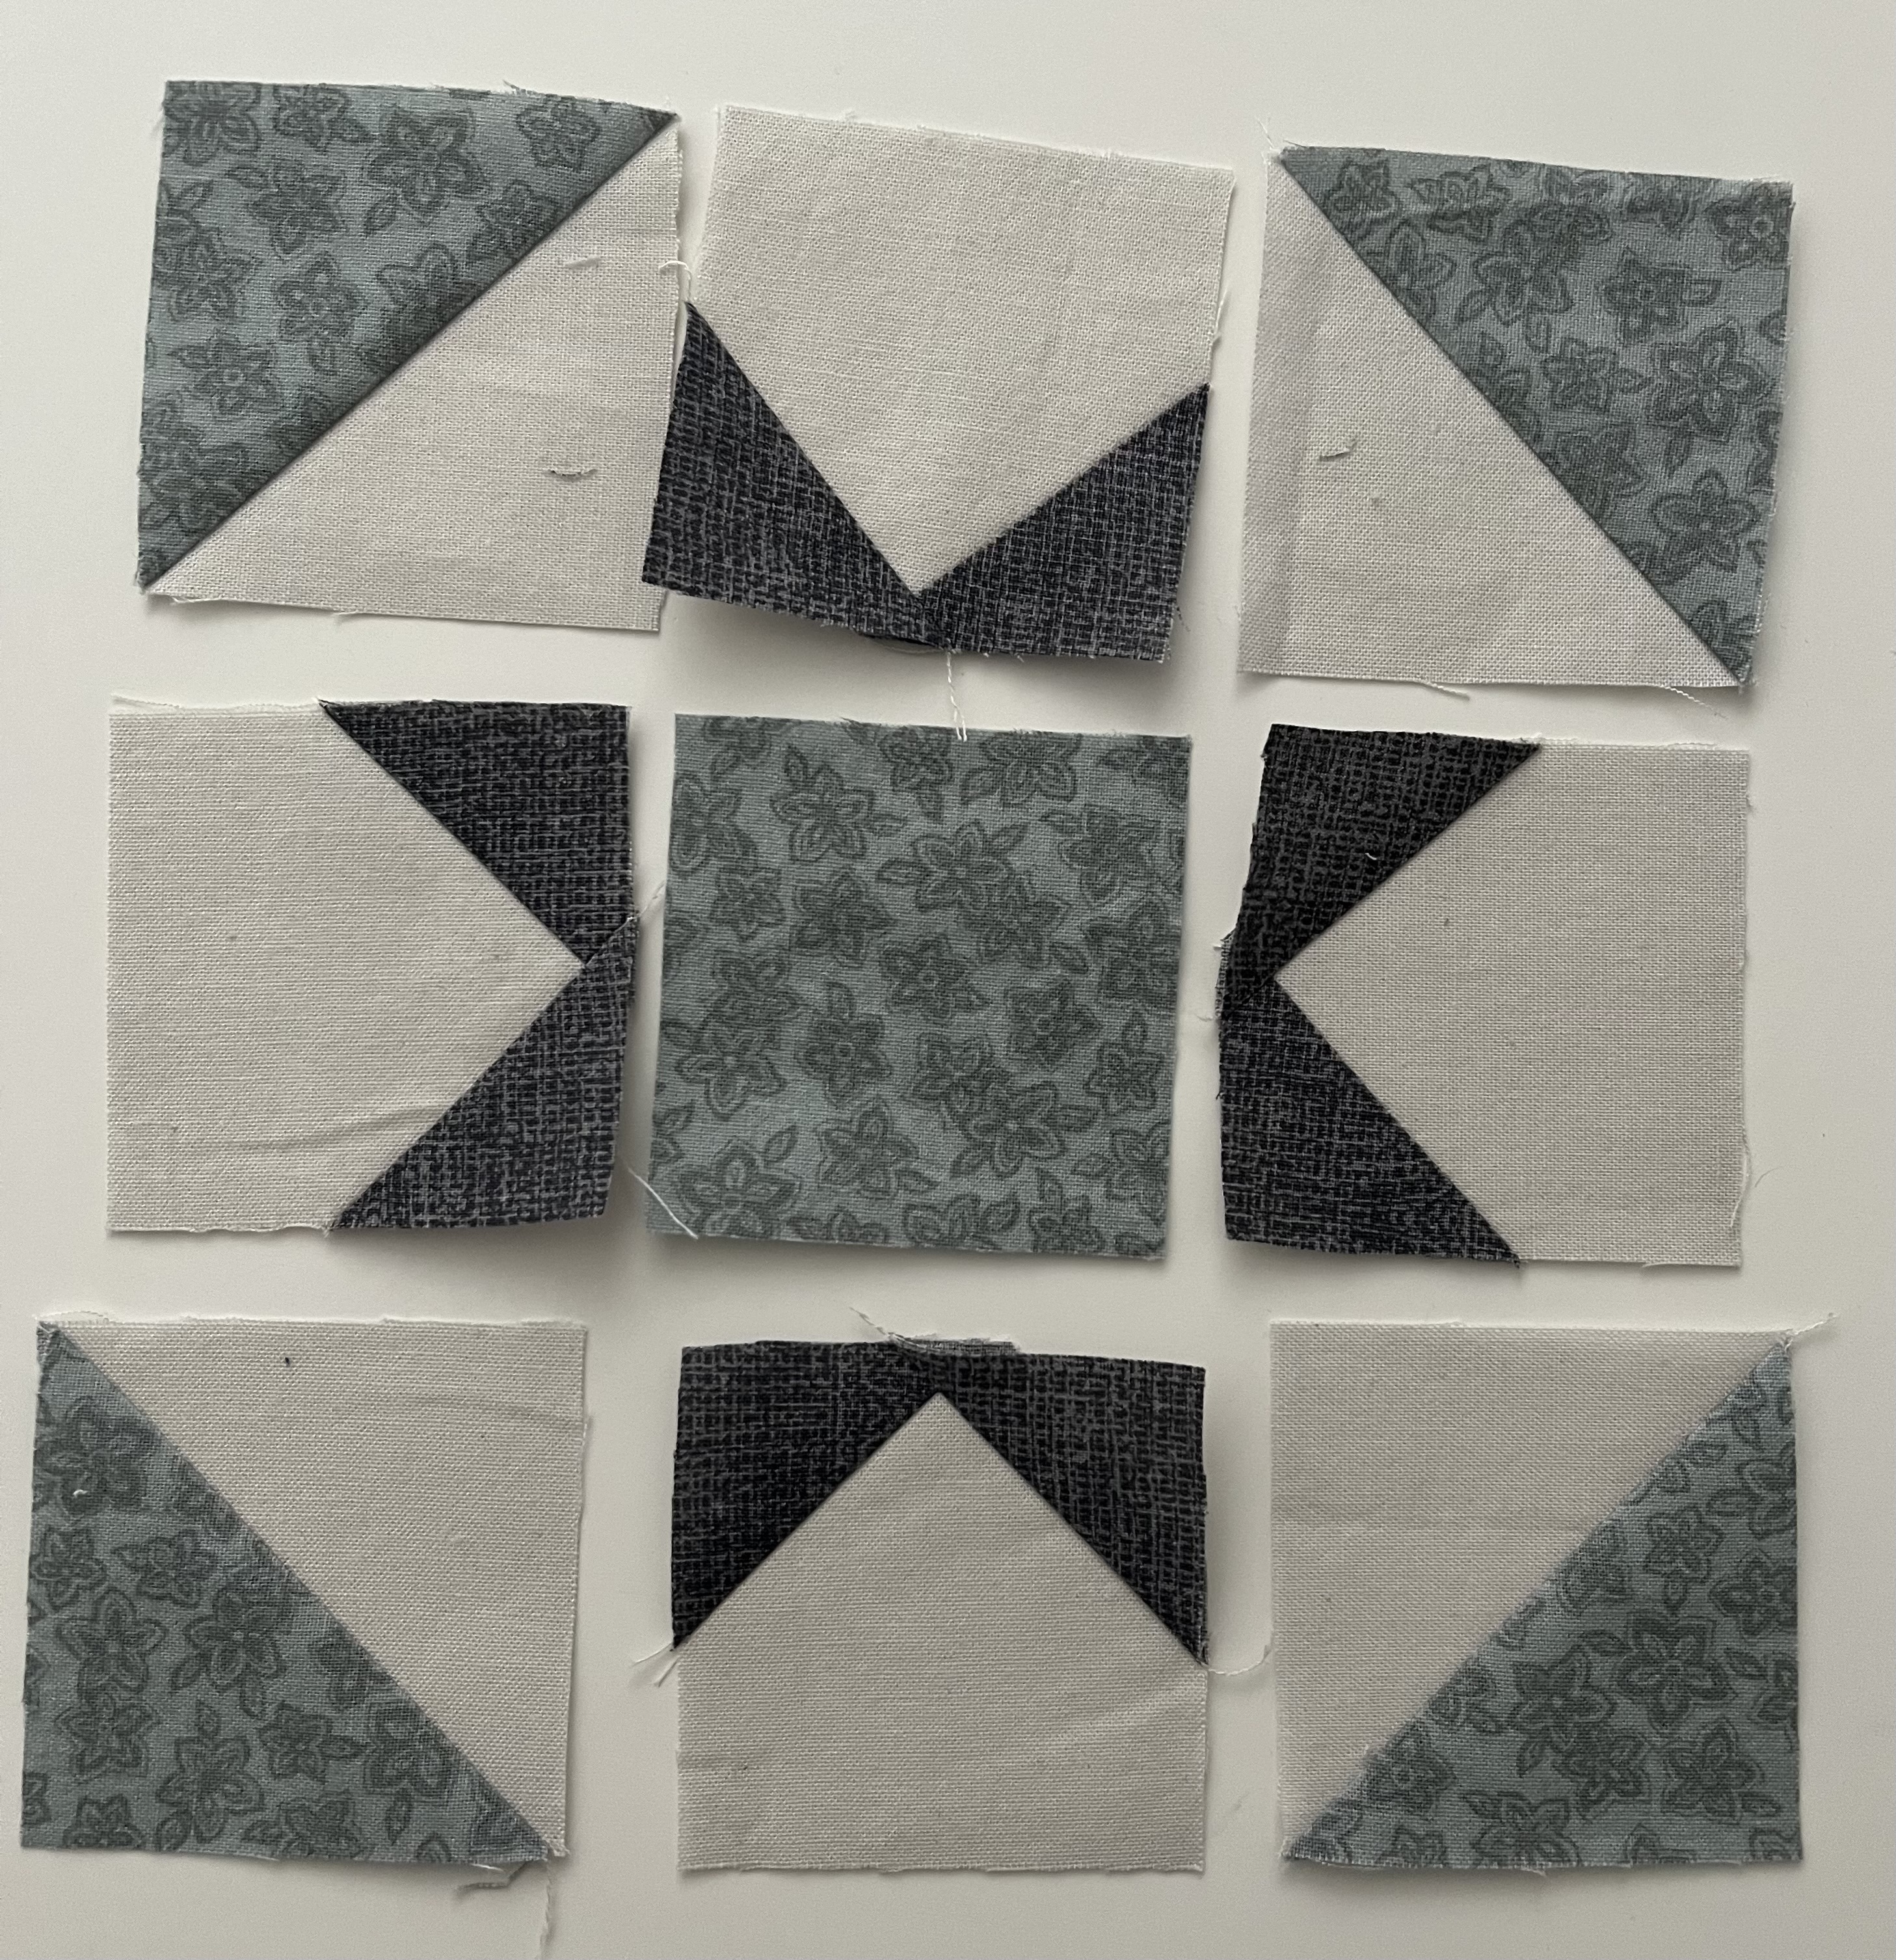
Hen & Chicks October Block 1 - Mourning Star


I know, its another Ohio Star Variation! Once I find a pattern that I am enjoying, I tend to work on a themed. This one has inner triangles that contrast and some additional corner squares. I saw other versions with little leaflets in the corners, but that was a bit much as far as piecing in a tiny block. Maybe I will do that one when I am making a bigger block. I saw a Lori Holt video on YouTube that did a nice flip and sew version that I would love to try.

I chose to strip piece the corner squares, but you could easily swap out squares if that is what is in your scrap bin.


The thing that makes this block different is that there are three fabrics in the QST rather than just 2. One HST will be light and dark gray while the other will be light gray and background. Pretty simple switch, but it makes a big difference in the final look of the block.
Layer the large blocks right sides together. Set 1 is dark and light. Set 2 is light and background. Draw a line along the center diagonal

Sew on either side of the center line for the HST units.
Sew your strip set together.

Cut along the drawn line then press seams toward the light gray. This seams counterintuitive when it comes to the dark gray fabric, but it will make sure your seams nest when you make your QST units.


Layer each dark/light HST with a light/background square. Draw a centerline and sew again just like you did last time. Make sure that the center seams both go in opposite directions so that they will nestle and form a neat center seam.
Press and time dog ears.

I used a dark center square in the large block.


Subscribe to:
Comments (Atom)