Showing posts with label Hen and Chicks.. Show all posts

Tuesday, October 1, 2024

Hen & Chicks October Block 4 - Forty

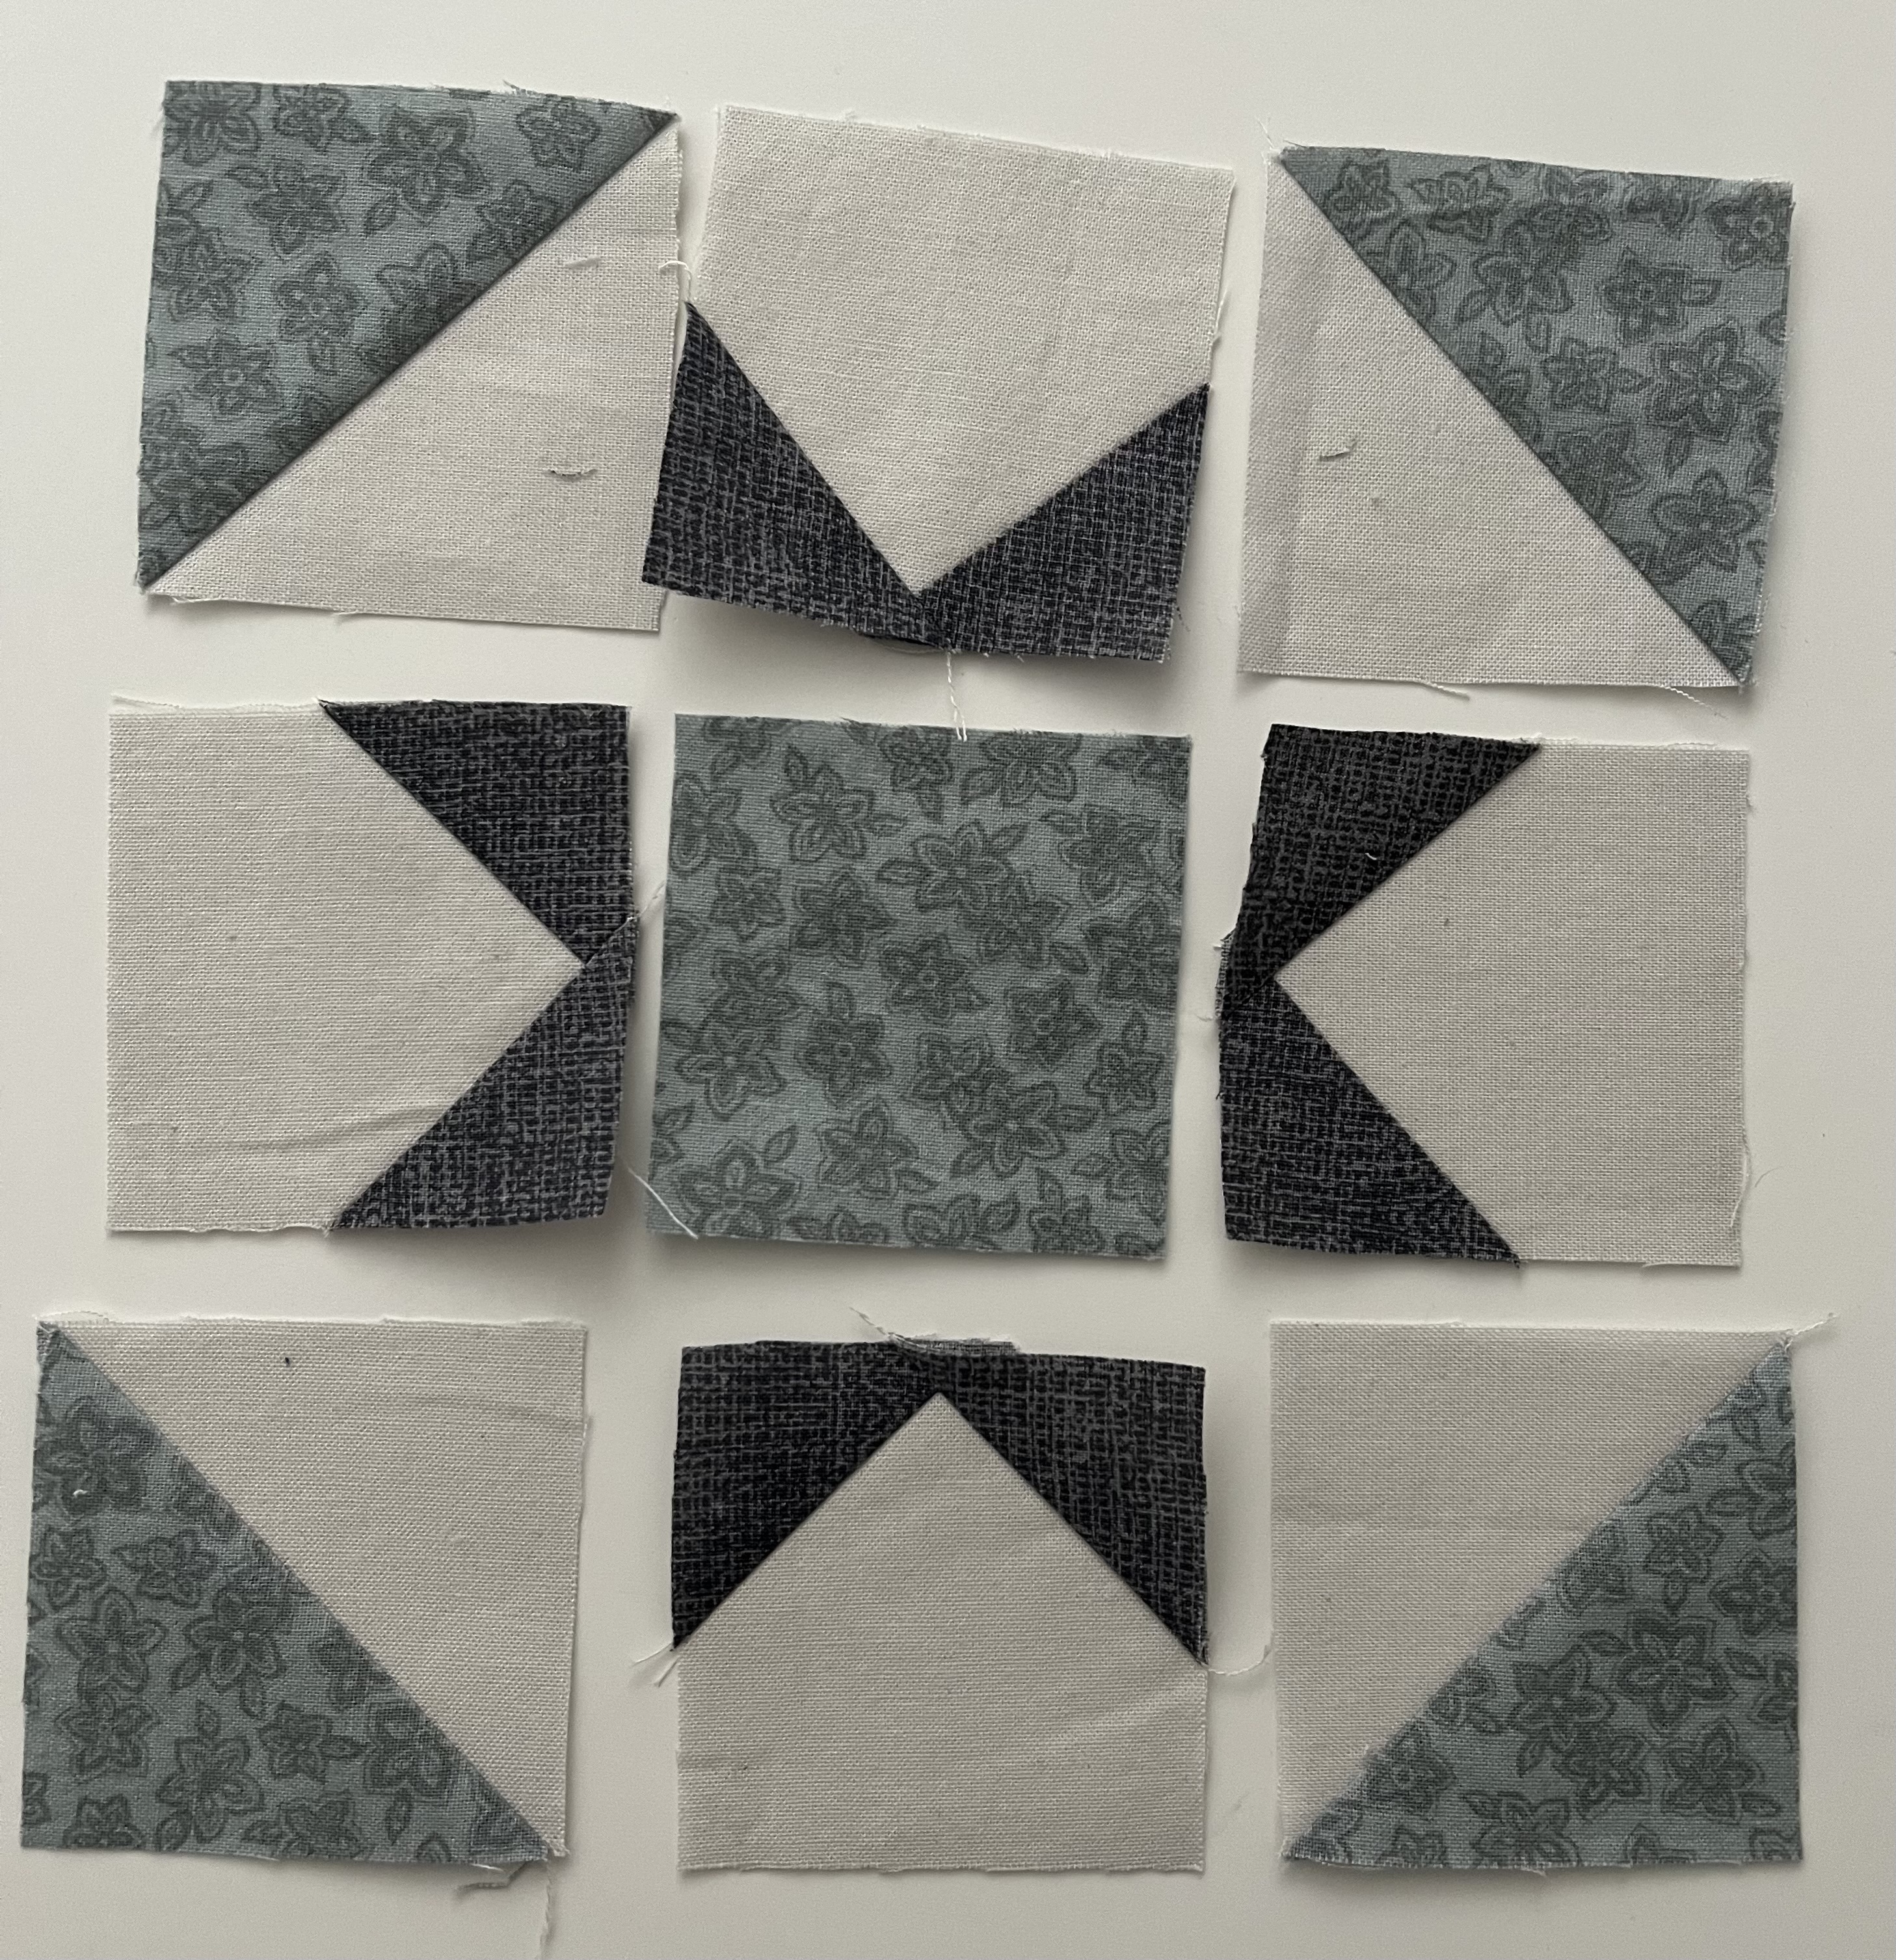
Block number 40. The last one! This one is fittingly called forty, it is made of four "T"s.  

Actually, it is made of flying geese, but the arrangement forms the letter T in each corner. Use your favorite method 4 HST units. You know that I used the Easy Angle ruler, but the chart has measurements for the square method. I am using flip and sew triangles for the flying geese again this time. Not what I would do for a larger size block, but it does make the math easy. 

Draw a line on the diagonal of each small brown square. Place it right sides together on one end of each background rectangle. 
Sew on the drawn line, flip and press before trimming away the extra fabric beneath. 

Repeat on the other end of each background rectangle for a total of 8 flying geese units. 

Sew the geese into pairs, both facing in the same direction.  Press the seams away from the point of the top goose.  


Arrange the geese pairs along the edge and point the white goose bodies toward the center square. Go ahead and double check so that you don't sew the whole block together wrong like I did.  (Unsewing is so much less fun than sewing!). 
You don't really see the serifs on the Ts until it all comes together. I suggest a fabric with a nice strong contrast to get the full effect.  That's it. Our last block. Done!
Congratulations!!!!


Hen & Chicks October Block 2 - Dandy


Yet another star block. This one is easy to assemble with sew and flip triangles and corner triangles frame the block nicely. 

Use the method of your choice to make HST units. Everything else is just a square. I used a light gray for the corners and a darker gray for the star points. The center square can be dark or light gray. 


Draw a line along the diagonal of each small gray square and place in one corner of each background square. Flip, trim and you have one star point. 

Repeat the same procedure for the adjacent corner. Viola, two star points!
You will have 4 star point blocks along with 4 HST units and a center square of your choice. 

Put them together with the star points all touching your center square and the HST blocks in the outer corners forming a frame. 

Sew as a nine patch and press away from the star points. 


Hen & Chicks October Block 1 - Mourning Star


I know, its another Ohio Star Variation! Once I find a pattern that I am enjoying, I tend to work on a themed. This one has inner triangles that contrast and some additional corner squares. I saw other versions with little leaflets in the corners, but that was a bit much as far as piecing in a tiny block. Maybe I will do that one when I am making a bigger block. I saw a Lori Holt video on YouTube that did a nice flip and sew version that I would love to try. 

I chose to strip piece the corner squares, but you could easily swap out squares if that is what is in your scrap bin. 


The thing that makes this block different is that there are three fabrics in the QST rather than just 2. One HST will be light and dark gray while the other will be light gray and background. Pretty simple switch, but it makes a big difference in the final look of the block. 
Layer the large blocks right sides together. Set 1 is dark and light. Set 2 is light and background. Draw a line along the center diagonal

Sew on either side of the center line for the HST units.
Sew your strip set together. 
Cut along the drawn line then press seams toward the light gray. This seams counterintuitive when it comes to the dark gray fabric, but it will make sure your seams nest when you make your QST units. 
Sub cut strip sets and combine with background rectangles to make corner framed squares. Press away from the two patch and toward the background rectangle. 
Layer each dark/light HST with a light/background square. Draw a centerline and sew again just like you did last time. Make sure that the center seams both go in opposite directions so that they will nestle and form a neat center seam. 
Press and time dog ears. 

I used a dark center square in the large block. 
And then tried a light center square in the smaller block. It is a matter of taste, so choose the one you prefer. 
Here is the finished block with the dark center. Press away from the quarter square triangle units to reduce the bulk. 


Sunday, September 1, 2024

Hen & Chicks September Block 4 - Mrs. Brown's Choice


I played around with the layout on this one quite a bit. There are so many different color arrangements to try out. Eventually I settled on hot pink star points with everything else in a black print with pink swirls. 


This is another set of Rolling Stone like snowball blocks. Traditionally it starts with a square on point with one of those 7/8 inch measurements.  I hate those!  I get that the flip and sew triangles lead to a bit more waste, but they avoid those tricky measurements, so I feel that it is worth it. 
Draw a line across the diagonal of all the small squares. Start with a small pink square in the corner of 4 black squares and sew on the drawn line before flipping, pressing and trimming.  

Add another pink triangle adjacent to the first. Sew, flip, press and trim. 

These will form the points of the center star.  

Rotate the black square and add a white square to the third corner. Sew, flip, press trim... same as before. 

Getting tedious yet?  Just one mor to go!
Here are your 9 subunits. 4 snowballs, 4 HSTs and the center square. 
The arranging is always the fun part. Point all the triangle points toward the center square and then fill the corners in with the HST units with the dark points facing in. 
Sew the nine patch and press away from the snowball units. That is where the bulk of the seams are and the trick is to get them to lay as flat as possible. 


Hen & Chicks September Block 1 - Spiky Star


I have seen lots of versions of this star out there, so I am not sure to whom to attribute it. I feel like Bonnie Hunter did it as a leader and ender challenge at some point in the past. I also found a Lori Holt tutorial on You tube with a more controlled version which is what sparked my memory. I have a quirky fun quilt in Virginia with spiky wonky stars together with shoofly blocks that I just love. Wonky is a relaxing way to sew, but you can also do this more traditionally if that is what you prefer. 


Start with one center square and 8 background squares all of the same size.  Add in an assortment of smaller squares in a range of sizes. I happen to have a drawer full of 2 inch squares that I pulled from, but you should use whatever you have on hand. 

Place a square into one corner four of the background squares. You can draw a line of course, if you care about perfect consistent points, but I chose to be free and wing it!

When sewing, you can sew corner to corner along the diagonal, or any straight line closer to the corner. I tried to use a variety of distances to vary the spike size of the finished block. As long as the flip and sew triangle will cover the corner, then it is good. Make sure that your seams are straight though, that part is important
Flip and press. Depending on the seam that you sewed, you might have some amount of extra fabric extending beyond the edge of the original square. Trim everything even with the base square. 

Then trim away the extra layer of fabric to leave just the spike. You can use scissors or a rotary cutter as the seam allowance is no longer critical.  
Repeat this process with the other spike. 
Now you have 4 pieces with 2 spiky points each along with background and your center square. 
Arrange the spikes around the center square and fill in with background corner squares. 

Sew as a nine patch, pressing away from the spikes. One of the nice things about this block is that it doesn't have any points along the outside edges to try to match. That does leave quite a bit of blank space though, which would be fun to fill with some extra flip and sew triangles in the outer corners if you were making a full quilt.