I'm trying to work in some applique blocks this year. I know that not everyone likes applique, but we will start with something nice and easy. Just a circle. There are A LOT of ways to do applique. I'll show you a few options as we work through the first simple blocks, but you should feel free to use the technique of your choice.
Rather than fussing with a printed template right away, you need to find something circular to use as a pattern. Something with a diameter between 3 and 4 inches will work perfectly. I found a drinking glass that worked form me. In addition, find some light cardboard to use as a template
Trace the circle onto your cardboard. Mine ended up at 3.75 inches. Cut it out on the drawn line.
Now find a scrap of fabric that is just slightly larger than your template. Use a pencil or erasable pen to trace the shape onto your fabric.
Trim the fabric a quarter of an inch outside the drawn line. No need to make it perfect.
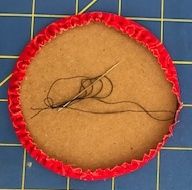
With a hand sewing needle and heavy thread, run a gathering stitch around the outside of the drawn line all the way around the circle.
Place the cardboard circle on the wrong side of the circle and use the thread to draw up the edges evenly around the template.
Use an iron to press the circle. You may use spray starch or sizing if you like to keep things firm.
Turn the circle over and press on the other side to make sure that you have a nice sharp crease.
Temporarily pin your circle down to a 5 inch square of background fabric. You can sew the circle down by hand or machine. I like to use a nice small blind hem stitch. You could try a blanket stitch if your prefer.
When the circle is sewn down, turn it over and trim away the background fabric behind the circle to reduce bulk.
Here is your finished circle. Block #2. If you are adding the setting fabric now, use the directions for a diagonal setting located on the RSC19 Sampler tab. I'm still waiting for my background fabric to show up, so I'll catch up to that part soon.


4 comments:
Good post with great visuals. When I teach appliqué, I use the same technique with one change. I suggest a dab of Elmer's Washable School Glue on the fabric to hold the appliqué in place. I enjoy reading your blogs. They are filled with good ideas and projects. D. Weeks (aka Momma Llama)
Just traced a tervis glass onto some junk mail for a circle.Now to grab a scrappy red to use for the circle... Thanks for the tutorial.
Thanks for sharing this wonderful tutorial! I've avoided applique in the past but want to try this. Could you explain how you got the cardboard out after ironing? It seems like it wouldn't be so easy to pop it out since the thread has been drawn tight.
Hi Angela thankyou for your tutorial ,i am also your newest follower hope you will visit and follow me too.
This is a great way to make a perfect circle,thankyou for sharing my friend xx
Post a Comment