Showing posts with label Tiny Tuesday. Show all posts

Monday, January 16, 2023

Happy Holiday

Three day weekends are such a great invention!   I was able to finish the hand sewing on the binding for another quilt today.  Like Streak of Lightning, this one isn't so much a block as a setting that could be used with any block.   If you look closely, it is just alternating columns of crumb blocks framed out in either white or black.  The columns are staggered, and then an extra strip on contrasting fabric separates each block to visually link the rows together.   
I also loaded a quilt onto the frame and made another tiny blue block.  Number 19 is called paper pinwheel and it is traditionally pieced.   Unless there are crazy angles, I am using regular piecing for anything that is a 4, 9 or 16 patch. I think I will start a page to keep track of the block names.  
 

Sunday, January 15, 2023

Sunday Feels like Saturday

I am moving everything downstairs and figuring out where it goes in the new sewing room.  Lizzie is keeping me company of course.   I thought about making bigger scrap bins to fit into the cube shelf, but now that I put the scrap bins in, I think it might be nice to store yardage next to bins.  The green is a little bit out of hand, as is the pink.   At some point I still need to make bins for black and brown and lights.  
Everything is still a bit of a mess.   I have an Ikea storage rack that used to live in Sydney's closet.   It is empty now, but It does a nice job of holding the Go! Cutter.   All of the unfinished flimsies are hanging on the storage rack.  I will load one up as soon as I get things cleared up a bit.  Sydney ditched the closet door at some point.  I will have to add that to the project list.  There is a nice outlet right in the middle of the wall, but it doesn't seem to work.  The list continues!
I peeked out onto the balcony just long enough to see the sun come up, but is a chilly again today.   There were some surfers out enjoying the waves.  I think they must be a little bit crazy!
Speaking of crazy, I have made 18 of the tiny blocks.  3 inches is just such an adorable size!  I cut a nice stack of plus blocks form 2 inch strips to use as leaders and enders. The blue crumb blocks are 4.5 inches.  They will be the centers for stars.  Still need to cut some 2.5 inch HST units, that can be my project for the afternoon.   First though, I think I will head over to Oh Scrap! And see what other scrappy fun people are up to today.  I have three new rainbow projects for 23.  You just never know when inspiration will strike for just one more to add to the list.  


Tuesday, January 3, 2023

New Year -- New Tracking Sheets

 RSC23 Tracking Sheet PDF

RSC23 Tracking Sheet Pages

RSC23 Tracking Sheet Word


Stephanie has been kind enough to make tracking sheets in a variety of formats for us again this year. I posted the links on the RSC23 page as well so feel free to print or save a copy for your own use as you work on projects for the new year. 
I started working on some tiny blocks.  These little babies will finish at 3 inches.   With seam allowances they are and adorable 3.5.   The math works out pretty easily for nine patches, but I will start to play with other subunits as well.   


I felt better about starting a new project after I webbed the bullseye blocks together.   After surveying ongoing projects, I decided to make a trip out for backing and binding fabrics today.   That should help with crossing some ongoing projects off of the list.   I can't show a photo though as everything is in the wash.   

Friday, March 19, 2021

Spring Break Productivity

Yesterday I painted the stairs!  My back is angry about all the bending, but they look so fresh and clean.  I almost hate to put back the plants that usually live there.   
Out bathroom glass finally got installed.  I'm just two days away from being able to shower in my own bathroom again.   The guys showed up the first time and turned right around and left after looking at the stairs.   They came back on Wednesday with two extra guys to help carry it up to the third story where the main bath is located.  
A fresh lifeguard stand is a sure sign that summer is right around the corner.  The spring break crowds have been impressive.  They aren't up at sunrise though, so no photos of crowded beaches to share.  

I have been savoring our daily  sunrise beach walk during the break.  I am going to miss that when school starts again on Monday.  Just nine more weeks though.  I think I will make it!


 The Tiny Tuesday Sampler is on the frame.  I am doing a tiny wave in the background and then minimal quilting in the colored areas of the blocks to knock down the puffiness.  I think I'm about halfway done.   I used a pieced section in the center of the backing and that has just shown up.   I was just too tired yesterday to stand at the frame and settled for some hand quilting instead.   Just two more days of break though, I am determined to make the most of it.


Tuesday, September 24, 2019

Tiny Tuesday - Bright Hopes

I was looking for something simple and straight forward tonight.  I seem to say that every Tuesday lately.  Bright hopes is on a basic nine patch (3 by 3) grid.  The thing that makes it different is the use of a partial seam at the beginning to allow a wrap around effect. 

 You will need a center block which is 2 inches and 4 rectangles which are 2 inches by 3.5 inches each.  That's it!
 The rectangles will be sewn in a swirl like fashion around the center square.  Start by folding the center square onto the end of the top rectangle. 
 You will start with a partial seam.  All that means is that instead of sewing from end to end, you will start in the middle of the background square and sew to the end.  Now the rest of the seams will be "normal" until you get back to where you started.  Fold down the center square and finger press the seam toward the purple. 
 Now fold the right side rectangle onto the straight edge formed from the combination of the center square and the top rectangle. 
 Fold that rectangle open, finger press the seam toward to purple again and move on to the bottom rectangle. 
 Sew the bottom rectangle open and move onto the left side. 
 Sew the left side on and you are back to where you started.  Now the partial seam you started with can be completed. 
 Fold the top rectangle down, the right end is already sewn, you just need to complete that partial seam. 
Sew from the end of the top rectangle back to the place where you started.  
Open it up and press to that all the seams go outward toward the purple rectangles.  I think the whole block took about 5 minutes to make.  Super quick one today!  Enjoy.  

Tuesday, September 10, 2019

Tiny Tuesday - Lantern

I'm stuck on one inch strips again.  Something about the math for this size block just makes it so easy.  Tiny pieces, but simple math.  Start with 5 purples and one or more background fabrics.  
 Cut one inch strips from each and trim them to the following lengths:
1 5 inch strip
2 4 inch strips
2 3 inch strips
2 2 inch strips
2 1 inch squares
I arranged mine from dark in the middle to lighter at the ends, feel free to mix it up to work with whatever scraps you have on hand.
From background fabric you will need the following lengths
4 2.5 inch strips
4 2 inch strips
4 1.5 inch strips
4 1 inch squares

 Arrange your purple strips with the long in the middle and the shorter strips stepping down in length on either side.
 Now arrange the background strips with the longest sizes on either side at the top and bottom and the shortest closest to the center.
 Sew the background strips to either side of the purple pieces.  Press the seams toward the purple.
Sew the rows together in pairs working from the top and the bottom.    Sew the pairs together, and finally sew each side onto the center purple strip.  That's it!  I know they are tiny pieces, but it came together so quickly.  I know I say this a lot, but I could easily make an entire quilt of this block.
I'm so glad to have a nice easy one tonight.  School has been crazy.  We are trying to squeeze in the three days missed from Dorian.  Three labs in 2 days and there is stuff everywhere!  I'll have to get it all cleaned up eventually, but for now it is happy chaos.  

Tuesday, February 19, 2019

Tiny Tuesday #8


Our guest designer today is Mari from Academic Quilter.  You probably remember her from last year's Squared Away sampler.  Today she has made a lovely tiny yellow flower block for us all to enjoy.  Here is a link to the PDF file for those who are saving the patterns.  This one is to be set on the diagonal.  I've mostly finished updated the RSC19 Sampler tab if you are looking for all the blocks in one place.  I just need to make the PDF files for the past two weeks and update those last couple of links.  

Tuesday, January 8, 2019

Tiny Tuesday - Block 2

I'm trying to work in some applique blocks this year.  I know that not everyone likes applique, but we will start with something nice and easy.  Just a circle.  There are A LOT of ways to do applique.  I'll show you a few options as we work through the first simple blocks, but you should feel free to use the technique of your choice.  

 Rather than fussing with a printed template right away, you need to find something circular to use as a pattern.  Something with a diameter between 3 and 4 inches will work perfectly.  I found a drinking glass that worked form me.  In addition, find some light cardboard to use as a template
 Trace the circle onto your cardboard.  Mine ended up at 3.75 inches.  Cut it out on the drawn line.
 Now find a scrap of fabric that is just slightly larger than your template.  Use a pencil or erasable pen to trace the shape onto your fabric.
 Trim the fabric a quarter of an inch outside the drawn line.  No need to make it perfect.
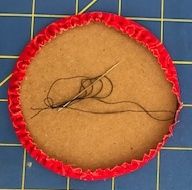
 With a hand sewing needle and heavy thread, run a gathering stitch around the outside of the drawn line all the way around the circle.
 Place the cardboard circle on the wrong side of the circle and use the thread to draw up the edges evenly around the template.
 Use an iron to press the circle.  You may use spray starch or sizing if you like to keep things firm.
 Turn the circle over and press on the other side to make sure that you have a nice sharp crease.
 Temporarily pin your circle down to a 5 inch square of background fabric.  You can sew the circle down by hand or machine.  I like to use a nice small blind hem stitch.  You could try a blanket stitch if your prefer.
 When the circle is sewn down, turn it over and trim away the background fabric behind the circle to reduce bulk.
Here is your finished circle.  Block #2.  If you are adding the setting fabric now, use the directions for a diagonal setting located on the RSC19 Sampler tab.  I'm still waiting for my background fabric to show up, so I'll catch up to that part soon.  

Tiny Tuesday - Diagonal Set #2

If the smaller setting squares seem like too tight of a fit, you might want to try this slightly larger version.  It will leave you about half an inch on each side to play with.  

 Materials:
  • 1 tiny Tuesday sampler block - 5 inches unfinished
  • 2 squares of background fabric 5.5 inches each
Cut the background squares in half along the diagonal.  

 Find the center of the sampler block and each of the triangles.  There are several ways to do this.  You may fold each in half and finger press or iron to mark the middle.  You can measure and mark the middle with a pin or a light pencil mark in the seam allowance.
 Match the center of a triangle to the center of the block.  Pin it in place.  Sew a triangle to opposite sides of the sampler square.
 Press the seams away from the center.
 Trim the dog ears of each triangle even with the sides of the sampler block.
 Match the center of the next two triangles to the center of the sampler square and pin.  Sew both triangles to the opposite sides of the sampler.
 The block should be about 8 inches square.  This will leave you plenty of room to trim it to the final size of 7.5 inches.

Tiny Tuesday - Diagonal Set #1

The math on diagonal set blocks is always a little tricky.  Because of the angles involved, they don't tend to work out to nice even sizes.  Either you can cut the inside square to an odd size and have and nice even size on the outside -- which doesn't work out well when you are working with a pieced inner block.  The other option is to use an even size on the inside and have an odd size for your finished block -- this option tends to make everyone a little bit cranky.  I'm going with option #3.  I'm using an even sized inner square and leaving it "floating" in the middle of an evenly sized outer square.  Setting option 1 uses even sizes to get almost exactly to the right finished size.  There will just be a tiny sliver to trim at the end.  If you block seems a bit small or you aren't getting enough breathing room, try out setting option #2 which uses larger squares for extra squaring up room at the end.  
Materials: 
1 finished Tiny Tuesday sampler block unfinished at 5 inches
2 squares of background fabric cut to 5 inches 
Cut the two background squares from corner to corner to yield 4 triangles.  
Mark the center of the sampler block and of the triangles.  There are many ways to accomplish this.  You can fold them in half and finger press.  You can iron them to get a nice crease in the middle.  You could measure them and mark the middle with a pin or a disappearing pen.  I chose to crease mine gently with an iron.  
Match the center of two triangles to the center of the block.  Pin the center and sew one triangle to each side.  Press the seams away from the center square.  
The triangles are oversized, so trim them so that the edges are even with the edge of the sampler block.  

 Repeat the same procedure with the other two squares on the other two sides.  Pin the center to make sure they go on evenly.
 Press the triangles so the seams go out away from the center block.
Your finished square should be just barely a smidge larger than 7.5 inches.  Carefully square up your block to the desired size of 7.5 inches.