Sunday, January 3, 2016

Scrappy Perserverance

I finished the center blocks for my Rainbow Scrap Challenge Dear Jane Quilt in July of 2014.  It got put away then while I decided whether or not I wanted to do the triangle border blocks.  I was in the midst of the Scraphappy Sampler of 2014 and got a bit carried away,  leading straight into the Sawtooth Sampler of 2015.  Those are both done now, quilted and bound.
And so I come back to Dear Jane.  16 border blocks are already done.  It would be a shame to stop now, with almost a quarter of the work done, right?  Last night I pulled out the Dear Jane binder again and started sorting through all the bits.  I even saved Ziploc bags of color coordinated scraps!
I resurrected the mini quilt map made from 2.5 inch squares of each fabric.
It really is time to finish this one up.  Wish me luck!

I'm linking up with Oh Scrap! this morning at Quilting is more fun than Housework, head over to see what other quilters are doing with their scraps this morning.


Row by Row Assembly

Because somebody requested it, I am backtracking to put together better finishing instructions for the Sawtooth Sampler Quilt.  If you go to the RSC15 Sampler page from the tabs at the top of the page, you should be able to find individual instructions for each color, but I never did a row by row assembly run down, so here it is:

Row 1: purple star, chain block with half purple, and a brown and indigo quarter, brown star, chain block half indigo and half brown, brown star, chain block a quarter brown, a quarter indigo and half purple, purple star

Row 2: chain block half purple and half light blue, indigo star, chain block half indigo and half blue, indigo star, chain block half indigo and half blue, indigo star, chain block half purple and half light blue

Row 3: light blue star, chain block half green a quarter light blue and a quarter blue, blue star, chain block half blue and half green, blue star, chain block half blue and half green, light blue star

Row 4: chain block half green and half yellow, green star, chain block half green and half light green, green star, chain block half green and half light green, green star, chain block half green and half yellow

Row 5: yellow star, chain block half orange quarter yellow and quarter light green,  light green star, chain block half orange half light green, light green star, chain block half orange quarter light green and quarter yellow, yellow star

Row 6: chain block half orange and half pink, orange star, chain block half red and half orange, orange star, chain block half orange half red, orange star, chain block half pink and half orange

Row 7: pink star, chain block half pink quarter red and quarter brown, red star, chain block half red half brown, red star, chain block quarter red quarter brown half pink, pink star

I a working on finishing up the PDF collection for past quilts, so this will go with the set.  Please let me know if any other directions or information is needed.  

Slowdown on Sunday

First, the important news:  I've finished all of the applique orange peels which was my hand sewing project from last year!  I was motivated you see, because I wanted to start a new applique project.  Quilty Folk has a Quilty 365 Challenge which asks you to applique a single circle each day.  She started back in November, but I was quite determined to finish one project before starting another.  January 1st seemed to me like the best date to start a calendar quilt, and so I waited patiently.  It has been fun to see how other people are interpreting the challenge, and because I have enjoyed watching so many different methods being used, I though I'd share mine.  
 I have some Karen Kay Buckley Perfect Circles.  I chose this 3 inch version, because it fits nicely on a 3.5 inch strip, and I've been trying to put bigger strips to work lately.  I use the template as a guide, and rough cut the circle, leaving a seam allowance around the outside.  Using a double piece of thread for strength, I do a small running stitch about an eighth of an inch from the edge.
 That gets all gathered up around the plastic template.
 Because the template plastic is heat proof (kind of), I can iron the fabric around the template.  I use a quick spritz of sizing spray to help the edges stay crisp.  I read somewhere that sizing is supposed to be better than spray starch because it doesn't attract bugs.  Also, I dropped the spray starch on the hardwood floor and cracked off the nozzle.  I am quite talented when it comes to dropping things you see.
 A quick press from corner to corner both ways on the 4.5 inch backgrounds square helps give some guidelines for centering the square.  I have a big stack of 4.5 inch squares ready to go, lots of tone on tones and light neutrals.
 After using glue basting for the orange peels last year, I decided to try pins this time.  4 small pins on each crease seems to be plenty.  Though the pins are a little less "perfect" than glue basting, I am just in the stage of removing the background fabric from behind my orange peels and regretting the glue a bit.  I am also regretting not removing all the background fabric as I went, so that is another thing I can do better this year.
 The applique is actually pretty quick after all of the prep work is done.
 I am making sure to remove the background fabric as I go this year.  I am so tempted to start appliquéing the small circles of background fabric onto a smaller square of dark fabric, but I have resisted so far.
The plan is to sew the blocks into rows of 7 days each week.  I should be able to assemble a big block at the end of each month, making the final quilt come together much more quickly in December.  I did the math, and a 3 by 4 setting of the months should make a reasonably sized quilt.  This year started on a Friday.  You can see that the Friday, Saturday and Sunday blocks are all finished and ready to go.  I felt it was important to have Saturday and Sunday together at the end rather than split on each side.  Monday through Thursday were not part of this month, so sadly, they just get empty squares.  I'm not committed to making all of the blocks blue for January, but so far, it just happens to be what is out and ion hand.
Do you have an urge to slow down with some handwork on Sunday?  Head over to Kathy's Quilts to see what everyone is up to.  It is always nice to take some time to slow down and just breath every so often.
I did used a random number generator to choose a winner for the blue hand dyed fabric from Vicki Welsh.  Carol S. was the lucky winner.   She doesn't have a blog, but is hoping to work on some Dresden Plates this year.  She says applique is her nemesis.  I used to feel the same way, but look at me now, seeking out new applique projects voluntarily!  Sadly, Vicki sold out of the rainbow palette packs completely, fortunately got one to use for the sampler.  She has lots of other beautiful fabrics though.  It has been wonderful to have her participation in the challenge for the last three years.
Kathy is sharing statistics this morning, so I thought I'd ponder numbers.  I finished 11 quilts this year!  They are listed on the My Quilts tab at the top of the page.  The most I have finished in a year was 17 in 2011, I think that was while I was still working part time.   The least was 5 in 2013, work was pretty busy that year.  

Saturday, January 2, 2016

ScrapHappy Saturday - Fresh Starts

Welcome to the first ScrapHappy Saturday of a brand new year!  New years are all about fresh starts.  Hopefully you have an idea or two that you are hoping to try out.  I started the new year with the first column of the sampler quilt for this year.  It was kind of nice to set up a mini assembly line and make multiple blocks for a change.  Its been all about single blocks for the last couple of years, and this quilt is a nice chance to chain sew a little bit.
January will give you a chance to put some of your blue scraps to good use.  Blue is a HUGE color for most of us.  I find that it is a nice color to start with, while everyone is still feeling fresh and motivated.  Notice that I have added a few hints of purple to the blue twinkler stars.  I'm not sure that purple will fit into all of my blocks this month, but it was kind of fun to mix things up a little bit.
If you haven't entered the drawing for the fabric giveaway yet, be sure to go back to the color reveal post from yesterday and leave a comment.  I'll draw a winner at random from all of the comments.
Until then, be sure to add your link to the list below so that everyone can come and see what Rainbow Scrap Challenge projects are getting started.  Not that you have to start something new.  I am sure there are a few rollovers from next year to enjoy as well.  Please add a link back to this blog in your post if you could, so that people can make their way back to the linky list.

Friday, January 1, 2016

Quilty Circles 365 - Day 1

I've been looking forward to starting the Quilty 365 Quilt along with daily circles since it started.  I was good though, and finished off my orange peels first.  I wanted to start on January 1 in any case to make it a true calendar quilt.  Since today is Friday, I picked out some background squares to fill in Monday through Thursday for this week.  I think that I will try to assemble the weeks as I go.  The blue circle is from one extra 3.5 inch square that I had left when I finished piecing the Twinkle Star blocks for my column-along quilt today.  I have a feeling that I lot of my days will be inspired by the colors of the month.
I sat and appliquéd the circle while watching the Rose Bowl football game with Kurt, but the Hawkeyes are not having a such great day.  Maybe it would be best to slip back into the sewing room and get a bit more sewing done instead?  

Row 1 is Done!

I've had a lot of questions today about the Rainbow Scrap Challenge and the Column-Along Quilt.  I try to answer each of the questions individually, but as lots of people today are coming up as "no-reply", I thought I'd do a quick rundown.
Each month, there will be a new color, along with an optional accent color.  The color will be announced at the begining of each new month, and you can always visit use the tabs along the top of the blog to go to a page if you miss any posts along the way.  Because we have a wonderful sponsor, the color announcement will also be accompanied by a giveaway for some beautiful hand dyed fabric from Vicki Welsh.   The RSC16 tab should have color information while the RSC16 Sampler tab will have links to block patterns and updates for the column along quilt.  Participation in the column-along is also entirely optional, most people choose their own blocks, but I like to keep things interesting.
You might also notice that I try to change the blog background to coordinate with the color of the month.  Sometimes I get anxious and do that a little early.  I'm easily excitable that way.
January is blue this year, and the optional accent color is purple.  The block, for those choosing to participate in the column-along, is a twinkle star.  You will need to make 8 for a twin sized quilt or 6 for a couch size.  I'm sewing mine together as I go,  so that the assembly at the end of the year will be super easy.  

Last Quilt of 2015!


 I was determined to finish the binding for Hawaii Sunset 1845 before the new year started.  We were gone on a cruise last week, and I seriously considered taking it along.  I didn't though, and so settled in for a marathon of binding sewing as soon as we got home and the laundry was underway.
I worked through Star Wars IV, V and VI, but it still wasn't done!  We did dinner and a movie with the kids for New Year's Eve, and there was still more binding to go!
Finally, at the end of Star Wars Episode I, I triuphantly reached the last corner in time to call this an official finish for 2015.  
This pattern was originally published in Quilter's Newsletter in the February/March issue for 2010.  I don't subscribe to the magazine, but I saw several people making the quilt, starting with Jo of Jo's Country Junction in June of 2012.  Fortunately, I was able to find a digital download and joined into the fun.  It is quilted with freehand Baptist Fans and backed with a soft steel blue floral that I got off the clearance shelf.  Lime green binding

Column Along January - Twinkle Star


 The January block for the Column-Along Quilt will be a Twinkle Star.  This is a slightly larger version of a star block that I have done for each of the last two sampler quilts.  It has been a favorite, and so I decided to bring it back in a different size.  Rather than the 6-inch size, this block will be a giant 9 inches finished!  As usual, I will be using a few of my favorite specialty rulers to make this block.  There are other ways to make the same block of course, so feel free to use whatever method is most convenient for you.  There is a paper piecing tutorial here  along with templates for the star points if you don't like using the rulers.
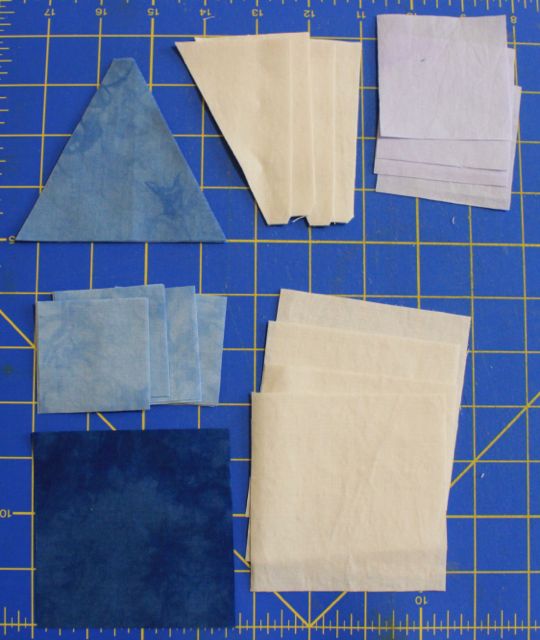
 To make the block in a nine inch size you will need 3.5-inch strips of background along with two shades of blue.  You will also need 2.5 and 2-inch strips.  I mixed things up and used different combinations of blue and purple for these strips.  
 The twinkle star features a star with skinny peaks.  I like to use the tri-recs ruler for this block.  It can also be paper pieced.  There is a GO die available as well, so use the method of your preference.  As long as your unfinished subunit is 3.5 inches, it will all work out in the end.  For ruler people, take a 3.5 inch strip in blue and use the "Tri" part of the ruler to cut 4 triangles.
 Next take a 3.5 inch strip of background fabric and use the "Recs" part of the ruler to cut 4 pairs of wings.  This is most easily accomplished by folding your fabric wrong sides together and cutting each pair at the same time.  That will give you the mirror image pieces that you will need.  Make sure to cut the small notch at the top, this will help you to line everything up for sewing.
 Other than those pesky triangles, everything else is a a simple square.  For each block, you will also need 8 - 2 inch squares and 4 - 2.5 inch squares along with a single square of 3.5 inch fabric.
 First sew one wing to each blue triangle.  When using the tri-recs tool, line the notch up with the bottom of the triangle.  Notice that their is a small bit of blue showing at the bottom as well as a tiny bit of background hanging off of the top.  This is correct alignment. The seam should hit the intersection of the tiny blue triangle and the notch.
 Once the wing is pressed with the seams going toward the background fabric, you should have a dog ear of background fabric at the top as well as a tiny tip of blue extending past the side of the block.  you can trip these later.  Repeat for all 4 triangles
 Next, sew the left side onto each triangle.  Alignment is a bit easier this time, as the tip of the new triangle should line up with your dog ear.  The notch on the bottom will still help you out as well.  Repeat for all 4 triangles.
 Press toward the seams toward the background fabric again and trim your dog ears.  Each unit should be 3.5 inches unfinished.
 We will use "flip-and-sew" triangles to make the small star points.  Look carefully at the photo.  Your squares are added to the base of the blue triangle.  Place a 2 inch square in the corner and draw a line from corner to corner.  Sew along the drawn line.  Fold the corner back and press.  You may trim the flap behind either now or later.  Make sure that the flipped fabric covers the corner and the edges are straight before you trim though.
 Repeat the "flip-and-sew" technique on the opposite corner and for all four star points.
 The "flip-and-sew" corners on the background squares are completely optional.  I think they make a nice secondary pattern when the blocks come together though.  Place a 2.5 inch square of blue onto one corner of each 3.5 inch background square.  Draw a line from corner to corner of the blue square and sew along the drawn line.
 Again, check the alignment and fabric placement before you cut anything.  This would be a nice opportunity to sew another line about half an inch away from the first sewn line to yield "bonus triangles".  Repeat for all four squares of background fabric.
 Your 8 pieced subunits will now combine with the solid blue 3.5 inch square to make a nine patch.
Sew as you would normally sew a nine patch and you should have a 9.5 inch unfinished block.  It will end up at 9 inches finished in the quilt.  If you are making the twin sized quilt, you will need 8 blocks total, and if you are making the smaller size, you will need 6 blocks total.  This should give you plenty of opportunity to mix up the color variety from block to block.
Scroll down to the last post to read about the color of the month and to enter the drawing for hand dyed fabric from Vicki Welsh.
The printable PDF is available on my web site here.  Three pages this month! I have included and handy cutting chart for 1, 6 and 8 blocks as well.  

January Color Announcement and Fabric Giveaway

Welcome to the first month of the Rainbow Scrap Challenge 2016!  The color this month will be blue.  Go and pull out all of your blues from the palest of light icy blues to the deepest colors of navy.  Do avoid the greenish colors as they will get their own turn to play later this year.
 If you are feeling adventuresome, you may also pull out your purples and add a few accents into your blocks this month.  The blues and purples together make up our inspiration palette which is called snowflake.  The accent color is a new addition to RSC this year.  It is there to add a little variety and spice to your blocks.  It is entirely optional though, and just using the main color each month will give you a nice tour of the rainbow by the end of the year.
Vicki Welsh has been kind enough to provide a bundle of hand dyed fabric to give away to one lucky Rainbow Scrap Challenge Participant.  To enter the drawing, just leave a comment of this post with the name of one pattern you plan to work on as part of the challenge this year.  One lucky quilter will win the blue sky gradient shown above.  I'll draw on the end of the day Saturday.  Good luck to everyone!

Saturday, December 26, 2015

Last ScrapHappy Saturday of 2015!

 Where has the time gone?  Next Saturday will be a new year, and so today is the final chance to celebrate the Rainbow Scrap Challenge of 2015.  Not that you can't just keep rolling right along into the Rainbow Scrap Challenge of 2016 of course.  I was super excited this week to finish up the Rainbow Scrap Challenge Sawtooth Sampler from this year.......
and the Rainbow Scrap Challenge ScrapHappy Sampler from last year.  Tutorials for both are still available, just check for the tabs at the top of the page.  I'm still working on converting everything into printable PDFs, so stay tuned.
The reason for all the frantic finishing?  It was to start new quilts of course.  The first tutorial for the new Rainbow Scrap Challenge Column Along Sampler will be making an appearance soon.  Until then, please share your own finishes, starts, or general scrap using plans.