Showing posts with label column-along. Show all posts

Friday, July 1, 2016

Rainbow Scrap Challenge Sampler 2016 July Block

I chose a nice simple block for this month.  Hopefully that will give everyone a chance to get caught up if they need to, and in the quilt, it will give the eye a little bit of a rest.  This block has traditionally been called Indian Hatchet.  It is a simple square with two flip and sew corners.  A lot like a snowball block, but with two corners instead of four.  

 Each block will need one 3.5 inch square and two 2 inch squares.  I am using pink and green for July.
 On the back of each small square, draw a line from corner to corner.  Pencil will work just fine, I have become very fond of frixion pens because the lines disappear during ironing.
 Place one small square on each corner of the large square.  Make sure that the lines run parallel to one another.
 Sew on each drawn line.  Technically, just one needle width to the outside of each drawn line will give you enough wiggle room for the seam allowance.
 Flip open the corners and press.  Make sure that the edges of the small green square line up with the edges of the large pink square.  Trim away the triangles left underneath the main block.

In the finished quilt, these blocks will be alternated to form a simple zig zag line.
If you are making the twin sized quilt you will need 24 blocks.  For the couch sized quilt, 18 will do it.
Happy sewing!

Friday, May 13, 2016

May Sampler Block

There are so many ways to make a flying goose block.  I will show you my favorite, but then give you links to other methods in case you want to try something different. 

  I like using specialty rulers because it allows both parts of the block to come from the same size strips of fabric.  to get 3.5 by 6.5 inch unfinished blocks, we will use 3.5 inch strips.
 The easy angle ruler is the same one usually used to make HST units.  It is used for the sky behind the goose.
The companion angle ruler is also used for quarter square triangles.  It is used for the goose part of the block.
 Start by folding your strips in half to get two pieces with each cut.  If you are planning to vary the placement of light and dark fabrics in the block, you can square off the end of a fabric strip and then get a pair of background triangles from the end of the strip used to cut wing triangles.
 Now that you are ready to start cutting goose triangles, you will need to switch to the companion angle ruler.  Notice that the center numbers show that you should use 3.5 inch strips and the numbers on the edges indicate that the block will finish at 6 inches.
 Now go back the easy angle ruler and cut pairs of background triangles.  These are your wing or sky pieces.
 Each block will need one goose and two wings.
Sew one wing to the right and finger press before sewing the other wing to the left.    
Remove both dog ears and press.  Make sure that you have a quarter inch seam allowance left at the top of the block.  It is really easy to loose this with an uneven seam allowance.
You will need 24 blocks for the large quilt and 18 for the small quilt.

Here is a link to perhaps the easiest method of making flying geese, the flip and sew.  It does waste fabric, but you can put the extra fabric to good use making bonus triangles if you like.  For fabric pieces of this size, it would be well worth the extra work.  you should cut one rectangle 6.5 inches and two 3.5 inch squares for each block.  
Here is a link to a no waste method that makes four blocks at a time.  You will need to cut your sky squares to 3 and 7/8 and your goose squares to 7 1/4.  There is a cutting chart here which lists many sizes of blocks.
Fons and Porter has a handy PDF of the same instructions for the same method.  Handy PDFs are always nice to save for later.  They also have a specialty ruler which allows you to cut both parts of the block from the same ruler.
Here is a link to another specialty ruler from quilt in a day.  Specialty rulers really can be useful for blocks that you make a lot.
Craftsy has a nice article with non-specialty rulers for comparison purposes.

Do you prefer a different method?  Leave a comment and I will try to add a link to this post.

Sunday, May 1, 2016

Scrappy and Happy on Sunday

 I have been out of town or scheduled solid for the last three weekends!  Crazy!  I need weekends to unwind and relax.  To sew!  Without that break from the busy school week, I tend to go a little bonkers.  That's where I am now, between bonkers and frazzled.  This was finally a weekend without any trips out of town or huge events to plan.  So first on the list was starting to get caught up on the column along.  The butterflies are done, but not sewn together yet, and most of the orange blocks are partially assembled.  Now on the the flying geese for May!  I still need to finish up the PDF files, but at least the links on the Sampler tab are up to date.
 Anna wants me to finish this shower curtain first though.  I was supposed to make it when I painted the girls bathroom.  I think that was two summers ago?  Bad Mom!  I will need more of the blue though, I remember using up most of it to finish off Hawaii Sunset.  So worth it though.
It only took half an hour to trim out the blocks for the t-shirt quilt.  The lattice fabric just came out of the dryer, so cutting that out shouldn't take too long.  We are all in the midst of mad cleaning now.  Kurt has invited all of his new work people over for a party on Thursday.  At least it is Thursday though, so I will still have a weekend to play when it is done.
I am linking up with Quilting is More Fun than Housework for Oh Scrap.  Head over to check out more scraphappiness.  

Sunday, April 10, 2016

Rainbow Scrap Challenge Sampler 16- Whacky Pinwheel


This month's block will need 1.5 inch strips of orange and black, dark and light orange, or orange and background.  Any two colors with decent contrast should work well.
 It is a four patch block, and each quarter will need 3.5 inch strips in each color as well as 2.5 inch strips in each color.
Here is the list:
4 - 3.5 by 1.5 inch strips in orange and black
4 - 2.5 by 1.5 inch strips in orange and black
 Start with the 2.5 inch strips.  Lay them right sides together with so that the orange is perpendicular to the black.  Imagine that you are sewing to binding strips together -- it is the same orientation.  I chose to sew this block with the orange angled to the left.  Draw a line from corner to corner along the waistband of the "pants" and then sew along the drawn line.  Never sew through the crotch -- ouch!
 Once you have sewn the strips together, open it up to make sure it is sewn correctly.
 If all is well you can trim away the triangles of fabric behind.  Repeat the same procedure for each of the four subunits.  Each one should be 3.5 inches.
 Now all you have left to sew is a simple rail fence block.  Line the three 3.5 inch strips up so that the short side of each color buts against the same color rail.
 Sew all three rails and iron the seams away from the center of the block.  Repeat for all four subunits.
Next, arrange the blocks so that the darker fabric (black for me), is facing the center of the block.  Each subunit is rotated 90 degrees around the center axis to give you the pinwheel effect.  


Wednesday, April 6, 2016

April is a Runaway Train

I can't believe that it is April 6 already and I have not yet put together a tutorial for the April Sampler Block!  I knew April was going to be a super busy month, and I was so much not wrong!
April's block is called a Wacky Pinwheel.  I did a tutorial for it in June of 2014.  I wanted to clean up the tutorial a bit and streamline the measurements.  Maybe I can get started as soon as I finish packing?!  I'm off for three days for a conference on brain based learning.  If you are ready to get started though, the original tutorial will at least get you started.  It is a 6 inch block.  So that means you will need 12 blocks for the large quilt and 9 for the small quilt.  Thanks for all of your patience.  May is going to be so much calmer.  I am almost sure of it.  

Tuesday, March 8, 2016

Column Along March Block - Butterfly

I'm starting to look forward to spring.  In honor of the warming weather, butterflies are coming out for this month's sampler block.  
 I'm going to use shades of purple for the wings and yellow for the bodies.
Purple: cut 2 rectangles 6.5 by 2.75 inches
Yellow: cut 1 rectangles 2 by 6.5 inches
Background: cut 4 squares 2.75 inches each
 Draw a pencil line on the back of each background square from corner to corner.
 Place one background square onto either end of each of the purple rectangles.  The diagonal lines should each point in to make mountains.
 Sew along each drawn line.
 Press the background squares in a "flip and sew" method.
 If you would like you may sew another line closer to each corner about 3/8 of an inch from each sewn line.  By cutting between the two seams, you can harvest 4 "bonus" HST units.
Sew one wing to either side of the yellow body strip.  Your finished block should be 6.5 inches.
If you are making the larger size sampler, you will need to make 12 blocks.  If you are making the smaller size sampler you will need 9.  

Sunday, February 7, 2016

Molasses Sunday

Some days I move faster than others,  Today I am moving like syrup on a cold day.  
I set up a little assembly line yesterday and got all of the pieces ready to go for patience corners.  We ended up having to run around most of the day, and a little fabric cutting was all I could manage.   
So Sydney now has some new Ikea drawers for her closet, and Kurt got his car back from the dealer in Orlando and I have some antibiotics that the doctor says should help me feel better any day now.  After all that running, hanging out on the couch last night was a top priority.  
 This morning though, I was able to sew together the February column along blocks. I decided to just put pink in two of the squares and use light brown for the corners.  I think it adds nice motion to the blocks.  I was surprised when I laid the blocks out next to the January blocks to find that they were not the same length!  I had to go and dig out a tape measure to find out that January was too long by 1.5 inches and February was too short by .5 inches.  I will work on making all the math add up later I suppose.  Ideally, all the rows should be 72.5 inches unfinished.
 While playing with the browns, I was happy to find this football fabric in honor of super bowl Sunday.  Maybe I will stitch it down during the game.  We are supposed to go to a party, but I am thinking of letting Kurt go without me.  I'm sure he wouldn't mind.
That would give me some extra time to finally finish the binding on my postage stamps.  I thought it would get finished up during Lacrosse on Monday, but not quite.  Then it was so cold on Friday that I went to a nearby mall and hid in a restaurant eating fries until practice was over.  Poor Sydney said she could hardly hold the stick because her hands were numb.
Check out this photo I got yesterday from Jill who does not have a blog.  She made it for last year's Rainbow Scrap Challenge.  Isn't it fabulous?  I really love the look of the black and white prints with the rainbow brights.  It looks like she is also on the binding phase.  Hope she is enjoying some slow stitching too on this Superbowl Sunday.  Be sure to visit Kathy for more slow stitching and Cindy for Oh Scrap!  


Saturday, February 6, 2016

Rainbow Scrap Challenge Sampler 2016

The block this month is a nice simple one called Patience Corners.  I chose it for the nice diagonal secondary pattern that it will make in a column.  
 For each block you will need the following pieces:
4 - 2.5 inch squares of "background" (I chose pink, but very light brown will also work)
4 - 1.5 by 2.5 inch rectangles of brown
4 - 1.5 by 3.5 inch rectangles of brown.
 Start by sewing a small brown rectangle to one side of each square.  Press toward the brown.
 Next, sew a large brown rectangle to one side of each twosie.
 Now you have 4 identical subunits.  Arrange them so that two diagonal corners have the brown side toward the center of the block and the other two have the brown side on the outside of the block.  Sew together as you would for any four patch.
When your block is done, the brown will make a visual figure 8.  The block should be 6.5 inches at this point.  it will finish at 6 inches in the final quilt.  You will need to make 12 blocks for the large quilt and 9 for the smaller version.
Keep scrolling down to the last post for today's linky party.  I'll link the PDF of this block to this post as well as the RSC16 Sampler tab as soon as it is done.  

Saturday, January 2, 2016

ScrapHappy Saturday - Fresh Starts

Welcome to the first ScrapHappy Saturday of a brand new year!  New years are all about fresh starts.  Hopefully you have an idea or two that you are hoping to try out.  I started the new year with the first column of the sampler quilt for this year.  It was kind of nice to set up a mini assembly line and make multiple blocks for a change.  Its been all about single blocks for the last couple of years, and this quilt is a nice chance to chain sew a little bit.
January will give you a chance to put some of your blue scraps to good use.  Blue is a HUGE color for most of us.  I find that it is a nice color to start with, while everyone is still feeling fresh and motivated.  Notice that I have added a few hints of purple to the blue twinkler stars.  I'm not sure that purple will fit into all of my blocks this month, but it was kind of fun to mix things up a little bit.
If you haven't entered the drawing for the fabric giveaway yet, be sure to go back to the color reveal post from yesterday and leave a comment.  I'll draw a winner at random from all of the comments.
Until then, be sure to add your link to the list below so that everyone can come and see what Rainbow Scrap Challenge projects are getting started.  Not that you have to start something new.  I am sure there are a few rollovers from next year to enjoy as well.  Please add a link back to this blog in your post if you could, so that people can make their way back to the linky list.

Friday, January 1, 2016

Row 1 is Done!

I've had a lot of questions today about the Rainbow Scrap Challenge and the Column-Along Quilt.  I try to answer each of the questions individually, but as lots of people today are coming up as "no-reply", I thought I'd do a quick rundown.
Each month, there will be a new color, along with an optional accent color.  The color will be announced at the begining of each new month, and you can always visit use the tabs along the top of the blog to go to a page if you miss any posts along the way.  Because we have a wonderful sponsor, the color announcement will also be accompanied by a giveaway for some beautiful hand dyed fabric from Vicki Welsh.   The RSC16 tab should have color information while the RSC16 Sampler tab will have links to block patterns and updates for the column along quilt.  Participation in the column-along is also entirely optional, most people choose their own blocks, but I like to keep things interesting.
You might also notice that I try to change the blog background to coordinate with the color of the month.  Sometimes I get anxious and do that a little early.  I'm easily excitable that way.
January is blue this year, and the optional accent color is purple.  The block, for those choosing to participate in the column-along, is a twinkle star.  You will need to make 8 for a twin sized quilt or 6 for a couch size.  I'm sewing mine together as I go,  so that the assembly at the end of the year will be super easy.  

Column Along January - Twinkle Star


 The January block for the Column-Along Quilt will be a Twinkle Star.  This is a slightly larger version of a star block that I have done for each of the last two sampler quilts.  It has been a favorite, and so I decided to bring it back in a different size.  Rather than the 6-inch size, this block will be a giant 9 inches finished!  As usual, I will be using a few of my favorite specialty rulers to make this block.  There are other ways to make the same block of course, so feel free to use whatever method is most convenient for you.  There is a paper piecing tutorial here  along with templates for the star points if you don't like using the rulers.
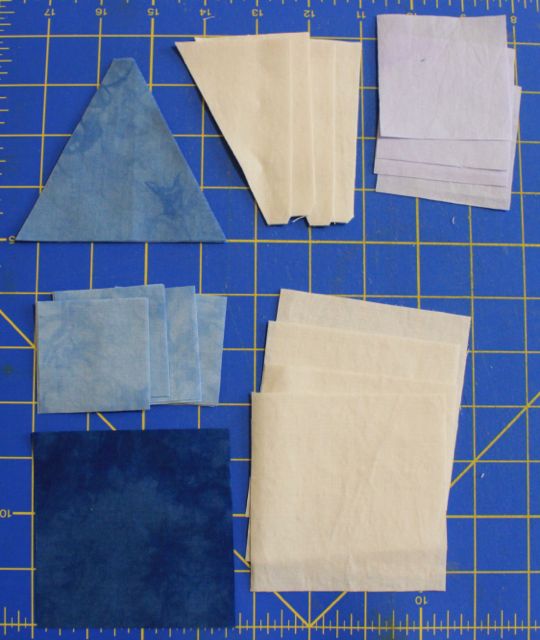
 To make the block in a nine inch size you will need 3.5-inch strips of background along with two shades of blue.  You will also need 2.5 and 2-inch strips.  I mixed things up and used different combinations of blue and purple for these strips.  
 The twinkle star features a star with skinny peaks.  I like to use the tri-recs ruler for this block.  It can also be paper pieced.  There is a GO die available as well, so use the method of your preference.  As long as your unfinished subunit is 3.5 inches, it will all work out in the end.  For ruler people, take a 3.5 inch strip in blue and use the "Tri" part of the ruler to cut 4 triangles.
 Next take a 3.5 inch strip of background fabric and use the "Recs" part of the ruler to cut 4 pairs of wings.  This is most easily accomplished by folding your fabric wrong sides together and cutting each pair at the same time.  That will give you the mirror image pieces that you will need.  Make sure to cut the small notch at the top, this will help you to line everything up for sewing.
 Other than those pesky triangles, everything else is a a simple square.  For each block, you will also need 8 - 2 inch squares and 4 - 2.5 inch squares along with a single square of 3.5 inch fabric.
 First sew one wing to each blue triangle.  When using the tri-recs tool, line the notch up with the bottom of the triangle.  Notice that their is a small bit of blue showing at the bottom as well as a tiny bit of background hanging off of the top.  This is correct alignment. The seam should hit the intersection of the tiny blue triangle and the notch.
 Once the wing is pressed with the seams going toward the background fabric, you should have a dog ear of background fabric at the top as well as a tiny tip of blue extending past the side of the block.  you can trip these later.  Repeat for all 4 triangles
 Next, sew the left side onto each triangle.  Alignment is a bit easier this time, as the tip of the new triangle should line up with your dog ear.  The notch on the bottom will still help you out as well.  Repeat for all 4 triangles.
 Press toward the seams toward the background fabric again and trim your dog ears.  Each unit should be 3.5 inches unfinished.
 We will use "flip-and-sew" triangles to make the small star points.  Look carefully at the photo.  Your squares are added to the base of the blue triangle.  Place a 2 inch square in the corner and draw a line from corner to corner.  Sew along the drawn line.  Fold the corner back and press.  You may trim the flap behind either now or later.  Make sure that the flipped fabric covers the corner and the edges are straight before you trim though.
 Repeat the "flip-and-sew" technique on the opposite corner and for all four star points.
 The "flip-and-sew" corners on the background squares are completely optional.  I think they make a nice secondary pattern when the blocks come together though.  Place a 2.5 inch square of blue onto one corner of each 3.5 inch background square.  Draw a line from corner to corner of the blue square and sew along the drawn line.
 Again, check the alignment and fabric placement before you cut anything.  This would be a nice opportunity to sew another line about half an inch away from the first sewn line to yield "bonus triangles".  Repeat for all four squares of background fabric.
 Your 8 pieced subunits will now combine with the solid blue 3.5 inch square to make a nine patch.
Sew as you would normally sew a nine patch and you should have a 9.5 inch unfinished block.  It will end up at 9 inches finished in the quilt.  If you are making the twin sized quilt, you will need 8 blocks total, and if you are making the smaller size, you will need 6 blocks total.  This should give you plenty of opportunity to mix up the color variety from block to block.
Scroll down to the last post to read about the color of the month and to enter the drawing for hand dyed fabric from Vicki Welsh.
The printable PDF is available on my web site here.  Three pages this month! I have included and handy cutting chart for 1, 6 and 8 blocks as well.