The January block for the Column-Along Quilt will be a Twinkle Star. This is a slightly larger version of a star block that I have done for each of the last two sampler quilts. It has been a favorite, and so I decided to bring it back in a different size. Rather than the 6-inch size, this block will be a giant 9 inches finished! As usual, I will be using a few of my favorite specialty rulers to make this block. There are other ways to make the same block of course, so feel free to use whatever method is most convenient for you. There is a
paper piecing tutorial here along with templates for the star points if you don't like using the rulers.
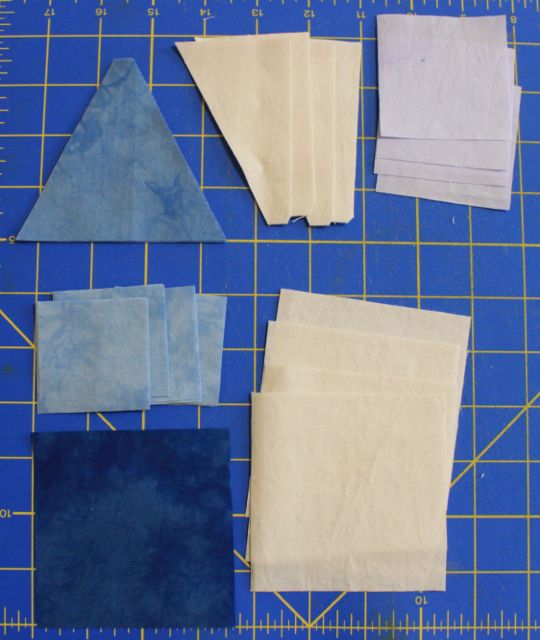
To make the block in a nine inch size you will need 3.5-inch strips of background along with two shades of blue. You will also need 2.5 and 2-inch strips. I mixed things up and used different combinations of blue and purple for these strips.
The twinkle star features a star with skinny peaks. I like to use the tri-recs ruler for this block. It can also be paper pieced. There is a GO die available as well, so use the method of your preference. As long as your unfinished subunit is 3.5 inches, it will all work out in the end. For ruler people, take a 3.5 inch strip in blue and use the "Tri" part of the ruler to cut 4 triangles.
Next take a 3.5 inch strip of background fabric and use the "Recs" part of the ruler to cut 4
pairs of wings. This is most easily accomplished by folding your fabric wrong sides together and cutting each pair at the same time. That will give you the mirror image pieces that you will need. Make sure to cut the small notch at the top, this will help you to line everything up for sewing.
Other than those pesky triangles, everything else is a a simple square. For each block, you will also need 8 - 2 inch squares and 4 - 2.5 inch squares along with a single square of 3.5 inch fabric.
First sew one wing to each blue triangle. When using the tri-recs tool, line the notch up with the bottom of the triangle. Notice that their is a small bit of blue showing at the bottom as well as a tiny bit of background hanging off of the top. This is correct alignment. The seam should hit the intersection of the tiny blue triangle and the notch.
Once the wing is pressed with the seams going toward the background fabric, you should have a dog ear of background fabric at the top as well as a tiny tip of blue extending past the side of the block. you can trip these later. Repeat for all 4 triangles
Next, sew the left side onto each triangle. Alignment is a bit easier this time, as the tip of the new triangle should line up with your dog ear. The notch on the bottom will still help you out as well. Repeat for all 4 triangles.
Press toward the seams toward the background fabric again and trim your dog ears. Each unit should be 3.5 inches unfinished.
We will use "flip-and-sew" triangles to make the small star points. Look carefully at the photo. Your squares are added to the base of the blue triangle. Place a 2 inch square in the corner and draw a line from corner to corner. Sew along the drawn line. Fold the corner back and press. You may trim the flap behind either now or later. Make sure that the flipped fabric covers the corner and the edges are straight before you trim though.
Repeat the "flip-and-sew" technique on the opposite corner and for all four star points.
The "flip-and-sew" corners on the background squares are completely optional. I think they make a nice secondary pattern when the blocks come together though. Place a 2.5 inch square of blue onto one corner of each 3.5 inch background square. Draw a line from corner to corner of the blue square and sew along the drawn line.
Again, check the alignment and fabric placement before you cut anything. This would be a nice opportunity to sew another line about half an inch away from the first sewn line to yield "bonus triangles". Repeat for all four squares of background fabric.
Your 8 pieced subunits will now combine with the solid blue 3.5 inch square to make a nine patch.
Sew as you would normally sew a nine patch and you should have a 9.5 inch unfinished block. It will end up at 9 inches finished in the quilt. If you are making the twin sized quilt, you will need 8 blocks total, and if you are making the smaller size, you will need 6 blocks total. This should give you plenty of opportunity to mix up the color variety from block to block.
Scroll down to the last post to read about the color of the month and to enter the drawing for hand dyed fabric from Vicki Welsh.
The printable PDF is available
on my web site here. Three pages this month! I have included and handy cutting chart for 1, 6 and 8 blocks as well.


20 comments:
Blue my favorite color. let the new year begin!
Happy New Year
Twinkler is probably my absolute favorite block ever. I'm hoping to get my 2015 RSC project to the finished flimsy stage by the end of this month.
Well, shucks, you've just made it harder for me to avoid the twinkle stars! I may be more inspired to try them at this larger scale. Time to pull out the blues!
I can see why this lock has been a favorite! It's very pretty.
Won't we need 8 2" squares?
When all the 8 blocks are ready, is it too soon to sew them into a column?
I love this block--great choice!
I'm making this with you this year. But I'm not sure where to find the post with the color.
That block is so pretty. I had decided not to participate but now I am reconsidering!
I'm SEW glad that Twinkler is our 1st block for the RSC16!! I saw them being made last year and wanted to give it a try. Thanks! Off to see the tutorial...
Beautiful star Angela.
great star! there's a GO die for this block btw (or the triangle in a square!) I'm actually using it for my blocks :)
What a great block!
I have more blue than any other color in my stash (although yellow is my fav. color--but not for quilting!). I think I'm in good company....
Nice tutorial....you break it down perfectly so it is completely doable!
I am really looking forward to this challenge for 2016! Great beginning with the Blues- I have the perfect scraps for this one and I love the twinkle star block! Inspired to get sewing! My biggest goal this year is to use those scraps that have over run my space.
I really want to make some pineapple blocks and Jacobs Ladders this year too.
I am looking forward to my first Scrap Challenge. I have never attempted the twinkle star. Excited to begin.
LOVE these star blocks! Saw a link from Cynthia's post about her stars. Thanks so much for sharing the instructions on how to make them, they are definitely on my 'to do' list for this year and I will be visiting your blog again soon to see how the scrappy column quilt progresses :)
After the "flip and sew" corners are sewn, you state "This would be a nice opportunity to sew another line about half an inch away from the first sewn line to yield "bonus triangles". Would you mind explaining that to me? I'm having trouble "seeing" it.
For Linda-
I think she means 1/4 inch so that the triangles you cut off will be sewn together right away.
Bonnie Hunter (of Quiltville fame) calls these bonus triangles and explains her scrappy system (scrap users system)on her blog. This is to keep them from being waste, and/or pulled out of shape as their cut edge is on the bias.
Hope this helps!
I'm glad you put the links on a tab. I'm hopeless at keeping up with things! I do like this block a lot. I like that your directions reduce it to a 9-patch. I can do anything if it's a 9-patch. =)
Post a Comment